Showing posts with label 38 Canopy and Window. Show all posts

25 March 2018

Modification: Rear window sealing.

On 23-Mar-18 I had occasion to fly through rain for the first time.  I appreciated the free "plane wash" as the smudges on my windscreen faded away into the sky.  Thankfully, back on 16-Jan-17, when I installed the rear window, I sealed the joint between the rear  F-14126 Window and  F-01475 Aft Fuse Top Skin. 

But, twenty minutes following the rain, I had the plane back in the hangar.  I found that water had worked its way in-between the rear window and the roll over structure.  I decided to seal that area with siliconized latex caulking (which dries clear and is paint-friendly).  This is the same material I used to seal my antennas, as recommended by the EAA.
After the water evaporated (a quick process here in Colorado), I masked the area with tape.


Then deposited the caulking.


After smoothing it down with my finger, I pulled the tape then left the canopy open over night.


The next day, it was clear and did not interfere with the canopy when closed.


14 October 2017

Finishing: Canopy. Canopy clips in.

The canopy clips are finally in.  Here they are prior to installation.


It's very important that they be test fit with the canopy off.  And that the flox added on page 38-36 be properly formed so as not to interfere with the canopy clips' fitment.


Also, do not excessively deflect the F-01449A Cover Clip.  It takes very little deflection to deform it to an unusable state.  I destroyed two clips before I got it right.  See the inset below from Figure 3, page 38-36.

 
Canopy clips in place.  I should have pushed the left one further forward.  But the gasket sealant will keep the moisture out.


02 April 2017

Finish: Canopy and Window. Bent canopy skin. Fixed it too.

On page 38-20, the plans specifically direct us against bending the canopy skin.


With the canopy closed and the F-01471 Forward Top Skin cleco'd into position (left), the gap between the canopy and skin is nice and tight.  Opening the canopy slowly confirmed no interference between the Top Skin and canopy.  However, you can't fully open the canopy with the aft row of clecos in, because it will bend the canopy skin.  So I removed them (right).  It's clear that when the clecos are removed, the F-01455 Sub Panel forward flange sits further aft. That's bad only if you open the canopy in this state.


The problem was that the next day, I forgot I removed that top row of clecos, so upon opening the canopy, the below happened.  Ouch!  This looks bad but is fixable.


To make matters worse, about 2 months later, I had the top skin on with the full row of aft clecos in.  To avoid opening the canopy with those clecos in, I locked the canopy, figuring that a locked canopy would remind me about the clecos.  Well, a few days later, I came into the garage and tried to open the canopy.  "Oh, it's locked," I said obliviously, "I'll just unlock it and open the canopy".  Whoops.  See what I did?  The canopy skin was distorted against the clecos.


Metal shrinker to the rescue.  My friend massaged the skin down...


...and got the skin reasonably close to where it used to be.  It's not perfect, but you really have to look hard to see that it had to be forcibly manipulated back into form.


16 January 2017

Finish. Canopy and Window. Retrofit complete.

It turns out that in the tail wheel prototype, Van's found that there is some canopy flex at high speed.   So they released a revision to the kits in Jan-16 that directs builders to place locking pins along the C-01427-L/R Aft Canopy Rail Flange and C-01409-L/R Aft Canopy Rail that fit into the F-01421B-L/R Aft Canopy Decks.  Thus, this retrofit required some modifications.  Later kits included both the additional parts and pre-punched rails to accommodate this revision.  However, all builders must modify the Aft Canopy Decks (as each canopy fits slightly differently due to manufacturing tolerances and builder technique).

The process is quite straightforward and not complicated.  It's a well thought-out set of instructions.

First the template for the C-01453 Guide Pin is properly placed.


Requisite holes are drilled.


The guide pins are riveted (after proper preparation and painting).  I found I that AN470AD3-5 rivets, rather than the -4 that were called out for, were appropriate where there is more material.  The right image shows how the Guide Pins will never hold their paint as there is some contact with the Guide Plates when the canopy opens/closes (see below for description).


Clay is placed on the Aft Canopy Decks and the canopy is slowly dropped so that the guide pins just contact the decks.


A hole is drilled at a specific location in that clay, the clay is removed and the template with the C-01454 Guide Plate is positioned.


Mounting holes are match drilled and the hole for the Guide Pin is enlarged.  It's worth noting that the forward/aft position of the hole need only placed well enough, and be large enough, so that the Guide Pins can rotate (along a very large arc) into the Guide Plates.  This is why the hole is so much larger than the Guide Pins' circumference.  The inboard/outboard positioning of the holes is much more critical as that position is what locks the canopy into place along that axis, preventing flex.  This is why the Guide Plates are oblong with their axes oriented along the rail.


The Guide Plate is then countersunk (use a 120° countersink bit for CS4-4 rivets!), prepped, painted and riveted.  With the canopy closed, one can push on its sides to test the effectiveness of the retrofit.


The Guide Pins do not contact the Guide Plates when the canopy is opened from the inside using the hand hold at the top of the canopy.  However, when opening the canopy from outside with the little C-01437-L/R Canopy Handles, there is enough flex in the canopy to cause slight contact between the pins and plates.  This is what causes some paint on the pins to be rubbed off.

Finish: Canopy and Window. Rear window installed.

The plans have us seal the rear window in place by placing sealant between the skin and window.  However, some builders have found that the resulting visibility of the sealant through the window, as viewed on the inside of the airplane, is undesirable.  It has been suggested that the window can be painted to hide the sealant.  I thought that was a great idea.

So I temporarily placed the window and masked off the edge.


I mounted the window in my "paint booth" (a.k.a., freaking cold garage floor).


I made sure to cover all areas that should not get painted, scuffed the edge to give the paint something to bite into (left) and painted the edge (right) the same as the interior.


When fitting the window originally, I neglected to dimple the top center hole because at that time the task seemed insurmountable in the confined area.  I decided to use a nutplate and a screw to make the dimple.  Whilst the form of the skin around my "screwed-in dimple" is different than other, legitimate dimples, no one will notice.


Because sealant is used to seal the window, masking tape is very carefully placed to meet the skin edge (left).  Then the sealant is applied (right).  My friend is camped out in the baggage area (a.k.a., "economy seating").


Here is the ELT antenna after the window was installed and prior to lifting the masking tape.


The goopy mess (left) after shoving sealant into the joint.  And the removal of the masking tape (right).


The edges look clean.


The sealant is not visible on the inside.


I wanted to show that at the center of the rear window, where the window attaches to the F-01432A Roll Bar Brace, I had to use an additional thin washer to prevent the window from deforming into the F-01431A-FL/R Roll Bar Frame.

31 July 2016

Finish: Canopy and Window. Canopy fairing complete.

After some additional work, the canopy fairing is essentially complete.  Go here to read about the entire process of assembling the window.


You can see the wheel fairings in the above picture.  Those are complete and a forthcoming post will outline my experience as I'm waiting to finish the leg and intersection fairings before posting.

02 June 2016

Finish: Canopy and Window. Canopy window fitted, cut and drilled.

I had help for this entire sequence of steps.

The Canopy Assembly is placed on the airframe and aligned, then clamped into place along the Roll Over Structure.


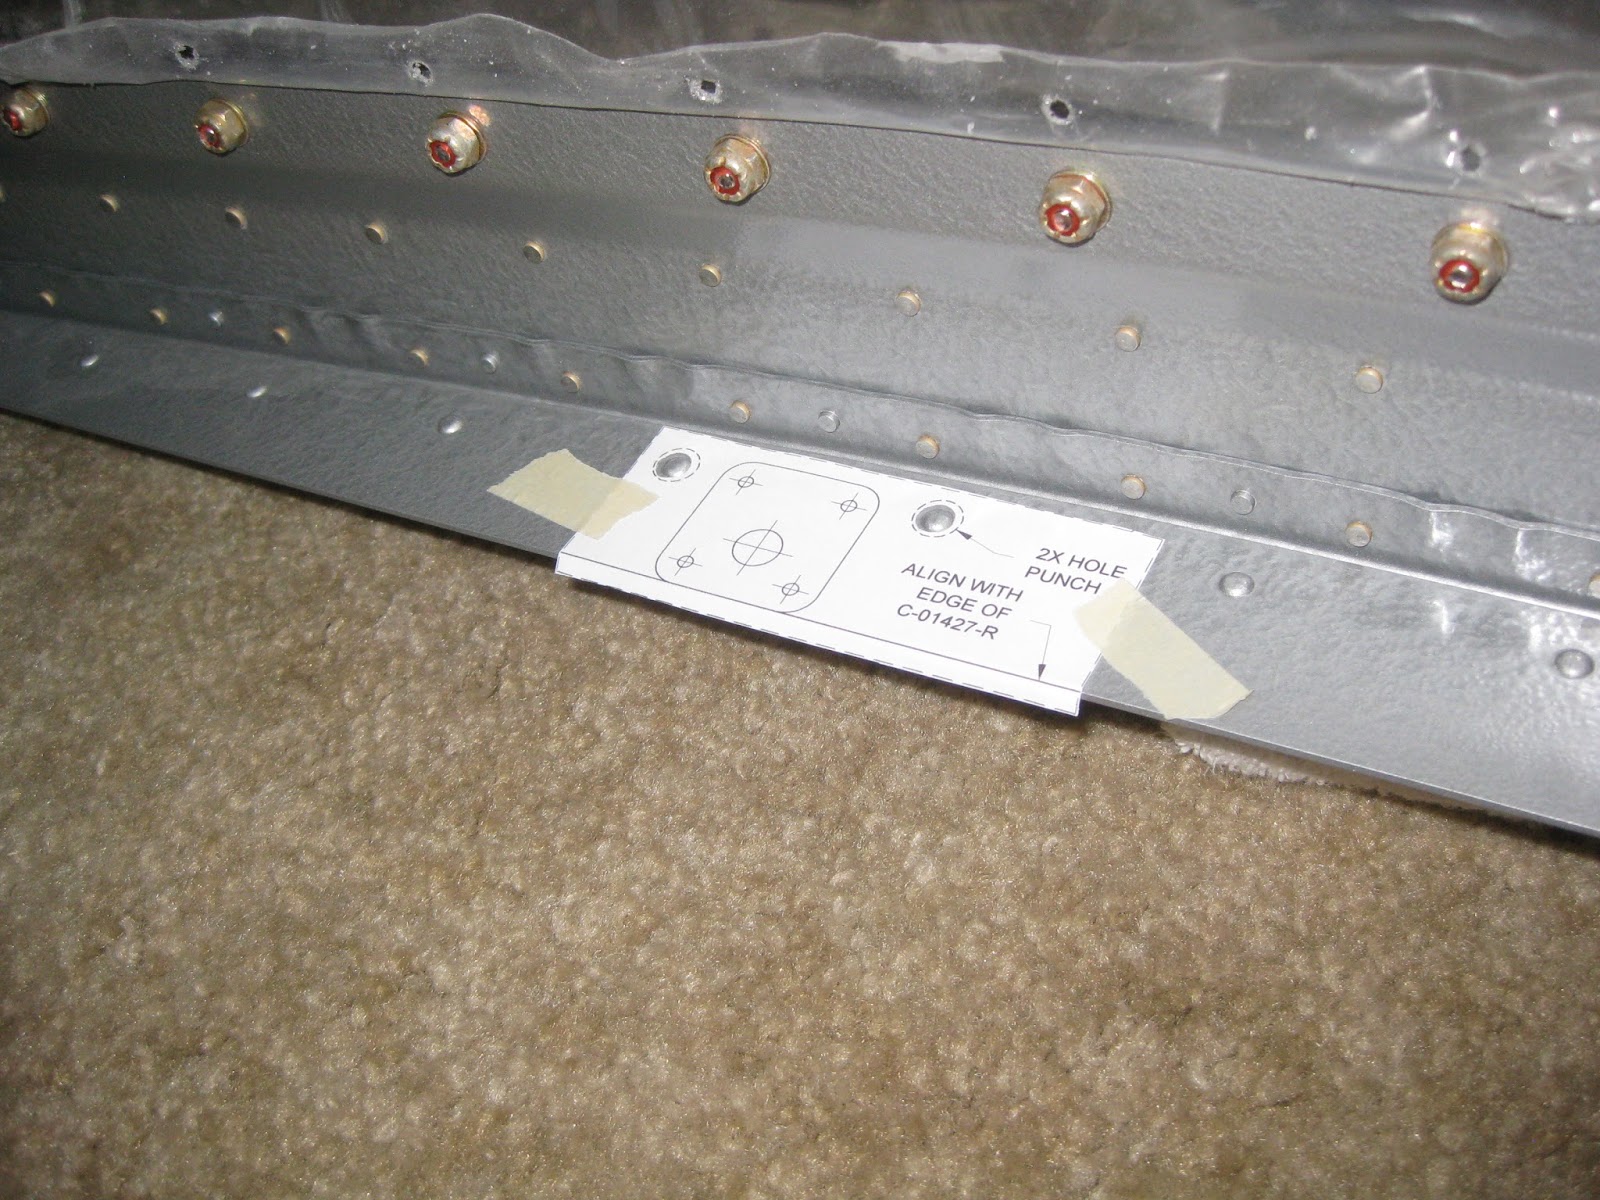
The Forward Canopy Alignment Template from 38-39 is properly positioned along the F-01418 Canopy Skin.


The C-0401 Canopy is placed on the assembly and aligned to the template.  It's important to note that prior to this step, the edges of the window were rounded, smoothed and finished to a glass sheen.  The left side required the C-01423 Canopy Shim as the window's thickness on that side was < 0.17" (per Step 7, 38-22).


The window is then weighted and strapped down for match drilling.


Match drilling follows.


Several holes fell victim to chipping.  Most of the chips were later removed during countersinking.  However, two holes had chips that were too large to be removed via countersinking.  So they were filed and sanded down smooth.  One hole cracked inside the plexi itself, shown below (the crack is on the top whilst the bottom visual aberration is due to the plastic covering).  Thankfully, it is under a C-01419 Canopy Side skin, so it won't be visible.  Should it crack, it will probably propagate no further than the hole is it in, or out to the edge of the plexiglas.  So I should never see it even if it cracks. 


This chipping/cracking did not occur on the rear window.  Of note, a #27 bit is not used when there is metal underneath the plexi when drilling the rear window.  Thus, we believe this chipping/cracking occurred on the canopy window plexi because the #27 bit is used when metal is underneath the plexi.  That metal visibly and tacitly grabbed the #27 bit and advanced it very quickly through the plexi.  Though we used a #27 plexi-bit from Avery, it has a far more aggressive rake than the #40 and #36 plexi bits I had specially made by Great Lake Aero Products.  In contrast, the latter's bits provided a dubbed off zero rake angle and slow spiral polished flutes (I can't determine if the Avery bit has that kind of flute).


Following match drilling, the area to be fiberglassed is marked off with electrical tape, then aggressively sanded so the fiberglass has a good basal substrate to anchor upon.  We did not use the dimensions called out for in the plans.  We wanted more area to develop a smooth transition between the skin and window.  If it turns out that the extra area is unnecessary, the additional material need simply be sanded down.


The Canopy Skin is then prepared for painting along the nascently defined "glare shield".  I primed the skin on 22-Aug-15, so the primer needed to be gently sanded and washed with denatured alcohol as prep for painting.


Painting was done with Rust-Oleum Chalkboard spray paint.  I choose this paint after testing it on some scrap.  It was very, very difficult to scratch, applied very smoothly and had little discernible gloss.  That's the kind of finish that makes a good glare shield.


The application was successful.  Don't worry:  Though the angle of the image makes it look like the canopy window in the background is on the concrete floor, it's actually resting on two carpeted platforms.


The C-01419-L/R Canopy Side skins were cleco'd (left) then riveted on (right).  Note:  The plans call for this step to be completed with the canopy on the airframe.  I chose not to do so and I can't remember why.


The C-01450 Rear Seal is attached (below).  


With the canopy on the airframe, it is then screwed on to the assembly in a very specific sequence. 


Why not pause to get an interior shot?  You can see my Garmin radio stack trays in place.


Five clips were used to secure the forward edge of the canopy window.  A digital level was used to align and shim the entire frame so that no twist would be induced.


Fiberglassing commences.  The ply templates provided in the plans were not used primarily because they didn't match the shape of the larger area chosen to glass over.


This might be the final layer, hence the peel-ply.


The special sanding block described on 38-41 was made by screwing together two 6" pieces of scrap 2x4, taping copies of the stencil on each side then working at the surface with the belt sander until the requisite curvature was obtained.  Took only 20 minutes.


As with the rear window, it's worth noting that the canopy window edges also needed zero trimming.  They perfectly lined up with the Rollover Structure and were up to the F-01431D Window Shims.  That's just amazing.

Considerable work remains until the canopy is completed.  The work outlined in this post was encompassed within 34.1 hours, 11.4 hours shy of the work required for the canopy frame assembly itself.