Showing posts with label 17 Outboard Leading Edge. Show all posts

02 July 2020

Modifications: Filled hole for stall vane.

I installed the stall vane per plans (page 17-07).  However, my GRT HXr EFIS on my panel does not support a stall vane.  The one thing the stall vane was consistently adept at doing was ripping my pants.  The vane had to go.  The only minor issue with doing so was filling the hole in the wing.

I mixed up some epoxy with flox and cab-o-sil and stuffed the mixture into the hole from the front, then reached in from the access panel and ensured it was adequately covering the hole on the inside.  I then put a piece of wax paper on the front, moving it around a bit to get rid of air then taped it down.


Upon removal of the wax paper, the area already looked pretty good.


Following some sanding with 200 grit followed by 400, it came out really nice.  And my pants look forward to no more snags.


19 August 2013

Wings: Leading edges. Leading edges attached.

Here is the left leading edge going on.  I had some help here as things were balanced on the couch.


Turns out nearly all of the rib-to-spar rivets are LP4-3 blind because it's impractical to buck them.  However, the inboard-most rib's spar rivets are AN470AD4-5 so they must be bucked (circled below).  But, they're very difficult to reach with the rivet set.  I used a double offset rivet set to reach the manufactured heads, but I kept mashing up the heads with the kind of smile that would make an orthodontist close up shop.  So after replacing those rivets, the left ones aren't as nice as they ought to be and I have yet to do the right side until I can investigate alternative methods.  I'm considering CR3213-4-3 Cherry Max.  Update 5-Dec-15:  I did not use the Cherries.  The difficulty I had with setting these AD470 rivets was that the offset rivet set kept spinning in the gun.  I've since learned to use duct tape to prevent the set from spinning and to increase the air pressure to accommodate the set's flexion.


The wings in their cradle in the entryway.


The wings parked behind the couch until I can get a house with a garage some day (which happened on 29-Mar-15).


To mitigate damage, I'm keeping the landing light lenses, stall-warner and tie-downs off until the wings are more complete.

17 August 2013

Wings: Leading edges. Landing light lenses cut.

Here are the posts pertaining to nav-strobe lights.
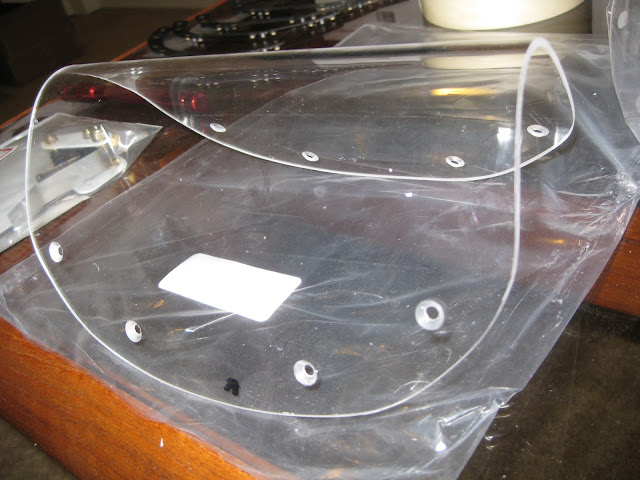
The lenses have been cut.  This is a two person job for sure.  We used a cutting wheel on a single speed Dremel then it was smoothed on the Scotch-Brite and radiused with 220 grit.  A dowel was used to help push the lens flush to the skin when the lens holes were being match-drilled to the skin (thank you for the idea Mark).

Pre-cut lens on left.  First cut on right (necessary to fit into leading edge to size the final cut).


Pushed in with dowel on left.  Match drilled to skin on right.


Final lens.  If you prefer the lenses to be flush rather than having a skin-thick lip around the edge, check this out.


And, just for giggles:  My RV-9A friend saw this and though they'd make good book shelves.  I'd rather use them for flying.

21 July 2013

Wings: Leading edges. Left side riveted.

Banged this one out in about 3.5 hours with help.  We had a system down and the mojo came together.  No rivets needed to be removed.  Here are both the left and right parts, parked in comfort until they're ready for the landing light lens fitting (and left side still needs the stall warner).


And here is a great suggestion on how to ensure the lens is properly aligned.  I plan to follow this approach.

19 July 2013

Wings: Leading edges. Right side riveted.

With the gracious help of my friend, we banged out the right leading edge in about 5 hours.  Only had to drill out two rivets (one due to an edge strike on the bucking bar and the other due to the shank folding over).  No Rivets of Shame necessary.  All that remains for this piece is cutting and fitting the landing light lens and fixing one skin hole that I missed dimpling (needs a dimple and a rivet).  We also riveted the access port doubler on the left edge and cleco'd everything together for its riveting fun.

Here is the right side, waiting for its landing light lens.


Here is the left side, cleco'd and ready to be banged out.


And a view down the top of the right (foreground) and left (background) leading edges.


Couple of points:
  1. When cleco'ing the ribs into the skin, start by keeping the skin outside of the cradle and cleco fore-to-aft, alternating top and bottom.  This way the skin tightens around the ribs rather than forcing the skin to mold to the ribs.  Once you get the clecos about 6-7 back on each rib, put the whole piece into the cradle and complete the clecos.
  2. Put a cleco in every hole to make sure all is tight.
  3. Tape the heck out of the edges of the bucking bar to avoid marring any surfaces.
  4. Keep the bucking bar and mushroom set orthogonal to the skin.
  5. You may have to drill out holes to get the rivet to sit straight.  There is a lot of curvature being forced into these parts and not everything will line up initially.
  6. Calibrate the air pressure so about 1.5 seconds of gun burst can fully set a rivet.  Saves lots of time.

14 July 2013

Wings: Leading edges. Stall warner assembled and landing light cavity painted.

As I waited for riveting help on the top skins, I surreptitiously worked on the outboard leading edges and fuel tanks.

Completed stall warner below.  I had to grind down the screw hole on the vane to prevent it from binding between the mounting plates.  The plans are clear that the vane should rotate freely.  Makes sense since the vane must be in the airflow and capable of freely pushing up against (or not) the switch.


Below are some leading edge and fuel tank parts primed as well as the landing cavity areas painted.  I went with black on the latter since it would add a neat contrast to the wings when painted.  This is how Van's demo RV-14A was done.


And finally, the leading edge skins, with their landing light cavities painted, ready for riveting.


I also have the pleasure of redoing the right wing tank attach assembly shim for the third time.  The first attempt saw me miscut the piece, the second saw me dimple the wrong side.  The third attempt should be the charm.

08 July 2013

Wings: Leading edges. Priming.

Long night:  Those parts from the outboard leading edge and fuel tanks that need to be primed have been prepped, cleaned, etched and primed.  As usual, I use Stuart System's EkoPoxy/EkoPrime. 

It was a challenge to work on the floor.  The gun had to be held at odd angles and I had trouble seeing through fogged goggles (even at 2200, it's toasty in July) with only three light bulbs providing illumination.  These factors conspired to cause a number of cases of excessive primer application, especially on the splice ribs.  However, since I was on the floor, I used the surplus boards from the work table construction to preventing priming the concrete.  Turns out, these are much better to use than the packaging paper.  The paper sticks to the wet primer and ultimately requires removing by light sanding, followed by a quick reprime.


Here is the stall warner hole on the left outboard leading edge skin.  This had to be cut and filed.  The kit provides starter holes (about the size of a #40) on the lateral edges.  The plans call for drilling the holes out to #10, drilling a series of #40 holes between the larger ones, then filing out the hole to size.

07 July 2013

Wings: Leading edges. Dimpling in the kitchen.

I'm out of space in the basement with both wings taking up 3 out of 4 of my workbenches and the suite of tools taking up the other.  That means there's no way I can dimple the outboard leading edge skins in the basement.  But, my kitchen counters are just the right depth to accept the DRDT-2 and can barely support the dimpling platforms.  Let the dimpling begin!


1.5 hours later, both skins are dimpled.  Lack of space?  Bah!

I'll move the wings upstairs behind the couch when I'm done getting the top skins on.  That will open up a lot of space (this was done 18-Aug-13).

06 July 2013

Wings: Leading edges. Landing light cutouts deburred, J-stiffener cut.

Nearly 7 hours of work today on the outboard leading edges.  I stole some clecos from the left wing top skins (don't worry, I returned them to myself).  Today was just match drilling the aft rib holes and the J-stiffener.  Then lots of deburring and finally dimpling the J-stiffener.

The landing light cutouts were done at the factory, but the cut appears to be a series of short linear ones in subsequently greater angles, so careful deburring to smooth it out is necessary here.  2" inch Scotch-Brite wheel to the rescue, followed by finishing with 400 grit.  The left image shows an edge prior to deburring whilst the right shows afterwards. 


You can see below that the top edges of the cutout are nice and smooth, whilst the bottoms are not just yet.

Here are the leading edges, left and right, respectively.  You'll notice that on the right leading edge, the J-stiffener is sticking out of the outboard side.  That's because I didn't like the 59 3/8" length the plans called out for.  It was too short - the last rivet hole was too close to the edge.  So, seeing as how I had extra J-stiffener around, I decided to try again and match drill prior to cutting.  Then, I could determine the length after lining it up with the last rib (so it wouldn't interfere with the wingtip) and make the cut properly.


I continue to wait for the #10 jobber for the stall warner hole.  I also tried to setup dimpling the skins on the floor, but it's too difficult on my body, especially after working 7 hours on the floor today.  I'll have to find some other place to dimple the skins until those wings get off my workbenches.

05 July 2013

Wings: Leading edges. Ribs cut, skins dimpled.

As I wait until I can corral help to rivet the top skins to the left wing and the arrival of some bucking bars for the right wing's inboard aft rivets at the rear spar over the doubler and fork, I started the outboard leading edge.  Back to working on ribs:  Deburring, final drilling, fluting, dimpling, etc.

The three inboard-most ribs have part of the aft sections cut to accommodate the main spar's forks.  The plans call for the builder to cut four of these ribs.  Here I am lining up a cut for W-1009-2L.


Here's a great example of how the stretching of the aluminum around the dimple can aggregate over many dimples to deform an entire piece.  I don't have a picture before these splice ribs were dimpled, but at that point they were very close in shape to what the plans diagram shows on the left.  The right is what happens after dimpling that thin material!


Because most of my 3/32" clecos are holding the top skins down on the left wing...


  ...I ran out of clecos for fitting the left outboard leading edge together.  And, as you can see, I also ran out of worktable real estate. So, on the floor it is for now.  In addition to more clecos, I'm waiting for a #10 jobber to drill out the holes for the stall warner (plan to use that with an AOA sensor...I like redundancy).

Tip:  When cleco'ing in the ribs into the skin, cleco the fore-most holes in each rib first and work your way aft.  If you cleco the aft-most holes, you'll have less freedom to adjust the rib to get its holes to line up with the skin.