Showing posts with label Shop. Show all posts

08 February 2016

Shop/Wiring: Bought a wire stripper.

I have wire strippers, however they aren't very effective at cutting through tefzel insulation.  So I decided to buy the right tool for the job, an Ideal 45-177 Stripmaster.


It comes with the L-5560 die-type blades for cutting #16 to #26 AWG wire, which is exactly what I need.


Prices new vary from $160-$200, however, it can be found on eBay for much cheaper than elsewhere.  This tool is glorious:  Cuts tefzel wire great and has made my panel wiring a much simpler affair.

21 December 2015

Shop/Wiring. Bought a crimper.

I've decided to make all of the harnesses for my aircraft by myself.  The cost to have these harnesses professionally made is an unnecessary expense for me.  Wanting to make them properly, I found that the crimper that seems to be the putative standard for the purpose is the Daniels M22520/2-01.  It can be found for an astonishingly broad range of prices from ~$250-$400, new.  Used, they can be found for much cheaper on eBay, as an example search illustrates.


The crimper has dies that are placed inside its ratchet mechanism, specific to the pins being crimped.   New, these dies range from ~$40-$70.  Used, they can be had for more than half  the cost.  


The ones of interest for me are
  • K13-1 (M22520/2-08) for male and female D-Sub pins, #20.
  • K41 (M22520/2-06) for female high density D-Sub pins, #22.
  • K42 (M22520/2-09) for male high density D-Sub pins, #22.
The K40 positioner (M22520/2-07) is for female pins in the 22 DM MIL-C-38999 circular socket, so I don't need that one.

01 July 2014

Empennage: Elevator. Trailing edge squeezer dies.

The trailing edge on the elevators in the -14 has a unique shape (internet lore suggests it was to match the flying feel of the Van's fleet).  It's an obtuse angle, forming a trailing edge that increases in thickness as you move aft (in contradistinction to a typical trailing edge wedge that converges to an apex).  This shape makes riveting the edge difficult as you have to support the elevator properly against the back-riveting plate or you risk marring the skins with the gun.


Several folks have reported successfully grinding down dimple dies to match the angle and then using the squeezer.  Avery Tools has manufactured application specific dies for the -14's elevator trailing edges.  I decided to give them a try as I didn't like how my left elevator trailing edge turned out (my trim tab's trailing edge turned out fine, but that's because I let my -9A friend do it for me - should have let him do the rest of the left side too!).  The safety pin contraption prevents the dies from rotating in the squeezer.  This keeps the surface of the dies oriented properly so they conform to the angle of the trailing edge.


When using these special dies, occasionally the skins would separate from the trailing edge wedge.  I couldn't determine why, but I was able to fix it just about every time it occurred.  Overall, I'm okay with how things turned out.


The image above seems to show the manufactured heads of the rivets somewhat proud.  It's an illusion perpetrated by the blue protective plastic covering.

I stopped using the tape as the plans suggest for adhering the trailing edges.  I used the tried-and-true method of sealant application on the elevators.

Now the elevators sit awaiting the rolling of their leading edges.


03 February 2014

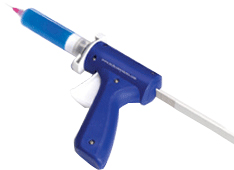
Shop: Bought a Semco sealant gun.

When I sealed my original fuel tanks (see here for why I'm redoing them), I used a $77 manual syringe gun (it's much cheaper on eBay, should have checked there first!).  It made things much easier than using Popsicle sticks and cotton swab stems.  However, it was hard on the forearm muscles and would continue to dispense after releasing the trigger.  Also, the 1 ounce syringes weren't realistically reusable, though at $0.62 each, that wasn't too much of an issue.


Turns out, one can find used Semco guns on eBay for much less than I bought my syringe gun for.  So, I picked up a used Semco model 250-A sealant gun for $30.  When done, I can probably turn around and sell this for what would essentially be a wash.


Mine comes with a 2.5 ounce container which is more than what I had with my syringe gun, so I'm thinking that I could buy a few 2.5 ounce cartridges and nozzles, fill them up with sealant as needed through the day and use them.  The next day I can easily pull the partially cured sealant out of the cartridges and reuse them.  I did something similar with the syringe gun to clean it.  Sealant does not stick to smooth plastic very well so it just peels off.

Stay tuned to this post to find out if Techon cartridges, plungers and nozzles work.  They're much cheaper than Semco's and look like they're the same shape.  Update 12-May-14:  I have verified that these do work with this gun.  Update 17-May-14:  And this elbow makes getting into crevices a breeze.

13 January 2014

Shop: Belt sander purchased.

Picked up a Craftsman 21514 4"x36" belt sander today.  Will help me finish the lenses on the wing tips, the rudder stops and later Fiberglas pieces.


15 June 2013

Shop: Rivet shaver bliss.

I bought a well-used rivet shaver off of eBay for $110 shipped.  It is a US Industrial/Aerospace Tools, model US 7337R3 with the guides.  The 'net didn't turn up any information on it.  Regardless, it works like a charm.  The much higher RPM afforded by this tool, compared to a 3000 RPM hand drill, coupled with the stabilizing guides, provides much happiness.


First, using some scrap angle, I set the cage to where the bit just shaved the surface.  Then I backed off the cage until the bit no longer shaved.  Running it over the proud rivets, it took them right down to flush in one shot.  The shaver loves air, so it made my compressor work hard.  Sometimes I had to hold off until the compressor caught back up.

Here are before and after shots of two different proud rivets.  You can see that the bit only shaved the rivet head, not the spar flange.  The scuffing on the right is just the primer ("spot-primed" the countersunk holes, per Section 13) removed from the flange.  Now that these rivets sit flush, I no longer need to worry about them gouging the top skins.


05 June 2013

Shop: Rivet shaver experience.

Update 15-Jun-13:  Go here to see my real rivet shaver.

I have some rivets on the main spar's flanges that are a bit too proud (hey, aren't we all?).  I need to nudge them flush before putting on the skins so they don't gouge out my skins.  So I snagged a rivet shaver bit and planned to use it in a microstop cage with a hand drill.  I experimented with it on some scrap and it seems the drill won't spin it fast enough.  The shaver gets caught on the rivet and starts dancing around like mad.  I'm looking to find a real 20,000 rpm cutter without breaking the bank.


The problem with those high speed cutters is they require a LOT of air.  On the order of 30 CFM.  My compressor can do 4.8 CFM max.  So, if I go with this tool (turned out I did get this tool 10 days later), it may need to be used in spurts of a few seconds each, separated by much longer bouts of compressor activity.  Another option would be to snag an auxiliary tank to increase capacity.  That option doesn't excite me.

Wings: Top skins. Prepping for riveting.

Bought some more tools (never can have enough tools!) in anticipation of riveting the top skins on.  I'd like to back rivet those skin, as I think it will leave their surfaces cleaner.  So I picked up the tools below.  The rivet sets should let me get around the rib flanges either by length alone or with the double-offset.  The bucking bar is apparently more forgiving on the skins, based on threads at VAF.

Dumbbell bucking bar.


12" extended back rivet set.


12" double-offset extended back rivet set.

04 June 2013

Wings: Rear spar. Attached.

The rear spars are on.  


My new longeron yoke was useful, but there were still some rivets it couldn't reach, so a few had to be banged out.

There are three rivets with minor smileys.  Not bad enough to warrant replacing.  Also, one rivet has a poor shop end since the bucking bar walked out to the edge.  I would love to replace it, but I'm sure I'd make it worse by elongating the hole since the factory head is nestled away between a flange and a web (I eventually replaced this).


Speaking of which, it's not easy to remove rivets whose factory head is on the flange of the rib since there's no good way to get a drill into that area.  How do I know?  Because I used a -6 length where I should have used a -8 on the doubler plate.  Trying to remove it was extremely difficult.  I used the die grinder to get in as close as I could and drilled a hole in the factory head.  Using a punch, I then tried to pry the head off only to "strip" the drilled hole leaving no point of leverage.  Then all I could do was try to remove the rivet from the shop end.  And when your rivet is already too short, there isn't much to work with on that side.  So in the end, I had to drill out the entire rivet, making the hole slightly bigger.  As a result, even the -8's shop end sits too low.  I would have needed a -9 so there was more shank to take up the additional volume introduced by the elongated hole.  So very little, if anything at all, was gained trying to replace that rivet.  Oh well.  What's done is done.

A similar issue occurred when riveting the torque tube support bracket to the right side rib:  Because on this rib I put the factory heads on the rib flange, I didn't rivet in the bracket until afterwards (to give space for the rivet gun).  This meant that I couldn't use the squeezer on one of the rivets because the flange bearing VA-146 was too high.  So using the offset rivet set, a major smiley was introduced into the rivet, enough to warrant replacement.  I should have used the 12" #40 drill bit to get to that rivet's factory head, but I didn't.  Long story short, I made a mess of the removal, making the hole very large and introducing many gouges into the body of the bracket, requiring lots of sanding.  You can see some of the mess in the image below on the right side.  I'll need to reprime that area before replacing the rivet.  I will use a -5 instead of a -4 rivet to make sure there is enough shank to fill up the extra volume of the elongated hole.


Building an airplane is a very humbling experience.  Many times one reflects on whether this was a good idea.  Time to push on.

16 May 2013

Shop: New drill press.

The "Craftsman 10 Bench Drill Press with Laser Trac reg 21900" is gone.  Darn thing just wobbled no matter what.  It cut elliptical holes, in fact.  I picked up the Skil 3320-02 from Amazon. 


Cheaper, better built and drills true.  Sears wouldn't give me my money back on the Craftsman because it was past 90 days since I bought it (sat on it too long), but they kindly gave me an in-store gift card.  I'm sure I can find a way to burn that there.

21 April 2013

Wings: Ribs. Deburring ribs made easy!

Here it is, the solution to all weight-saving hole deburring problems:  3M Scotch-Brite Fine-Finishing Sander.


Mounted in the drill press, it makes deburring the holes as easy as pie.  Already ran it through the main ribs.  Beautiful results.  You can hear the burrs coming off as satisfying audible "ticks".  This will make deburring the leading edge ribs go by so much quicker.


Then I will try 3M Utility Cloth Roll 314D for the little tabs and such.

07 April 2013

Setup and Project 2.

My new pneumatic cleco tool arrived, to replace the troublesome one, and can open clecos every time!  I noticed that the piston on this tool retracts much more slowly than the first one does.  That might suggest that the original one really did suffer from the leak around the piston that I noticed.

The manifold and supporting parts came in too.  I assembled it with Teflon tape and checked for leaks.  There is a very slow leak, about 30 psi in 8 hours.  That's not worth chasing down.  This manifold will be mounted under the table so I can negotiate the air tools and hoses easier.


The pop rivet set I ordered for the trailing edge of the practice control surface came in.  Turns out, the head of the nail doesn't fit through a #40 hole.  I had to get creative:  First I tried using a smaller nail, but it was too short for the pop rivet tool to grab on to.  Ultimately, I managed to get in there with some channel locks.  Without leverage, it's hard to squeeze the handles enough and it's a challenge to keep the dimple lined up with the hole. Turns out, on two holes, the dies weren't well aligned and I had to "upsize" those holes to a #30 to get the rivet to fit.  It won't look pretty when the rivet is set.  In retrospect, I should have done this.


Other entries for project 2 are here and here.

I also went to the local EAA chapter meeting last Tuesday night.  Joined and met some nice new friends.

02 April 2013

Shop: More tool updates.

I spoke to Avery Tools about the pneumatic cleco tool that seemed to be faulty.  He said that he hadn't heard of any problems with the tool and that he doesn't check them before sending (and he certainly shouldn't).  Bob graciously offered to send me a new one immediately and reimburse me on the return shipping for the faulty one.  In describing to me how the tool works, and if I understood him, seems like it may be the o-ring on the piston that could be faulty.

The tool is available from the manufacturer (Pan American Tool) for one-third the cost of Avery and Cleaveland, though whether they'd give the personalized service I received from Bob is uncertain.

Called Sears to get a new chuck sent out to me to (hopefully) fix my wobbly drill press.  It will arrive on Friday.

After looking closely at how the other builders are using air tools during the wing build, I decided I need to have a manifold under the table so I can easily access and use air tools on either side.  It would also let me put the compressor on the other side of the basement to make more space.  So I got these to support that effort:
Picked up these to support deburring:
Working on collecting water bottles from various sources for great rivet storage.

Grinder #3 (an exchange of #2) arrived and works much better, compared to #2 and #1. It still vibrates, but I can live with this amount.  Now, to figure out how to get the Scotch-Brite wheel on it.

Total tool cost thus far:  $2,975.00

31 March 2013

Shop: Tools, it never ends.

I really like the grinder I got to replace the original one.  It is a beast.  But it shook the whole house when running.  Wheel dressing didn't help.  The wheels were on so tight, I could only get one off.  The comments on Amazon were quite favorable towards the balance of this grinder, so I'm going to exchange it for another.  I feel bad since my Amazon Prime membership means they do 2 day shipping.  The extra plywood from the tables I built will probably be used for a dedicated grinder table so my drill press, band saw and other tools don't die from vibration.

Turns out the Scotch-Brite wheel I got is 1" thick and the grinders I've had so far can only handle 3/4" wheels.  Whoops.  Apparently these things aren't standardized.  Live and learn.  It's not that big a deal.  Just means that I won't have the wheel cover on, unless I want to buy another wheel (link no longer works) (and, it's far cheaper there).

Speaking of my new drill press with the wobbly bits, I bought a ball joint separator from Harbor Freight Tools to remove the chuck, thinking that there might be some debris that got stuck on the spindle or in the shank.  Cleaning both didn't help.  After closer inspection, turns out that jaws in the chuck are not straight.  Going to call Sears tomorrow to see if they'll send me a new chuck.  I already threw away all the packaging, plus they no longer carry that model even though I bought it 17-Feb-13.  It does have a lifetime warranty, so I could take it to the store and have them deal with it.


In an effort to reduce any RMI, I picked up a low RPM Black & Decker AS6NG Alkaline Cordless Screwdriver for deburring. Also got Shop Fox D3230 Magnetic Vise Jaws, 4-1/2-Inch to prevent marring gripped work, plus the book Standard Aircraft Handbook for Mechanics and Technicians to read when I'm on the road for work.

After reading Mark Cattell's experience deburring the ribs (the link to his site later become invalid and points to a malicious site so it was removed, 17-Feb-18), I'm eying these parts from Avery:
I'm also on the prowl for a rivet organizer.  I'm going to need one that has locking drawers and can withstand falling 4 feet onto a concrete floor without exploding into a shower of rivets.  There is no doubt that whatever is holding my rivets, it will fall.  Turns out, I'm going to go with this idea.  It's just genius.  I'll just cut the labels from the bags and tape them to the bottles.

30 March 2013

Practice: Toolbox kit complete.

Completed the toolbox kit.

From this:

 To this:

Total build time:  6 hours 4 minutes.

A lot easier than the other projects, probably owing to having spent time with the others prior to this one, and that this project was mostly just match drilling and riveting.

What I learned:
  • Rivet squeezer is much more reliable, at least in my hands, than the rivet gun.  I used the squeezer at every chance I had since, with the other practice projects, I didn't always get the head flush with the work and ended up with a nasty gap.  I had only a few rivets set with the squeezer that weren't flat on the shop end.  These probably occurred since, when applying force to the squeezer, I didn't maintain the squeezer in the same plane.
  • I couldn't figure out how to set the rivets on the bottom half latch.  I tried every permutation I could think of with the tools at my disposal.  Nothing would fit with one of the holes cleco'd.  Ultimately, I left the cleco off, tapped one rivet a few times so it would set slightly, then banged the other one, adjusting the latch as I went to make sure it was straight.  After the second rivet was fully set, I went back to the first to finish it off.  This caused the rivet to squish in between the two metal layers, creating a gap.
  • Even though the cupped set, for the universal rivets, typically stays put on the head, it can walk.  I ended up mashing one universal rivet head because I got too cocky.
 
  • Sometimes, after match drilling, deburring and dimpling, the rivets still were a tight fit.  So I "rematch drilled" and redeburred on about 6 or 7 rivets.  Wonder what's up with that and if that technique would pose structural integrity risks on the airplane? 
  • The hinge and handle could not  be cut with my snips.  In fact, the blade is now ruined.  So, I tried cutting them on my band saw.  Though it worked, it probably stressed out the blade.  The wire got red hot!
  • I used the dimple dies (dice?) in the squeezer for a few of the corner holes that wouldn't fit in the DRDT-2. 
  • I had a really hard time deciphering the description regarding the hinge orientation.  I eventually found these two pages that helped me get some confidence:
Here are some shots of my riveting.


My pneumatic cleco tool from Avery didn't work.  90% of the time, it would only partially open a cleco, then stop.  I finally tracked the problem down to an air leak around the piston.  When it was leaking, it couldn't open the cleco.  The few times it had a seal, it could open the cleco fine.  I'll let Avery know so they can replace it for me.

Also, seems the time lapse software is failing me.  After a few hours of running, it starts to drift and takes images at longer and longer intervals.  For example, today it was setup to take images every 10 seconds, which it did, initially.  By the end of the build day though, it was taking images every 31 seconds.  That sucks, since I was calculating the time I spent working by how many images were acquired.  I'll mess around with it and see if I can track the issue down.  For now, my build times aren't accurate.

I'm going to switch to using a butane soldering iron for scoring the protective vinyl.  The cord from the electric iron 1) gets in the way of everything and 2) is going to get sliced by a sharp edge, which would provide me with a brief light show and an undesired spot weld.

Finally, project 2 (the control surface) is on hold.  I had to order this pop rivet set so I can dimple at the tapered edge of the ribs (the vise is cool, but I was concerned that it may still have a challenge getting into tight spots).  I broke my (borrowed) #40 countersink bit trying to make the suggested tool in the plans.  Turns out the guide hole on the bit is #30!  I didn't realize that, so it snapped right off due to the friction.  From now on I will check these things.

Here are my outstanding issues that need to be solved prior to my wings coming:
  • The new bench grinder itself, or the wheels are poorly balanced.  It shakes, rattles and rolls.  Dressing didn't help.
  • The drill press bits always wobble.  The chuck seems center, but the collar doesn't.  Not sure what to do just yet.

26 March 2013

Shop: Pneumatic cleco tool.

All this cleco'ing is killing my hands.  It's the 21st century so I need to preserve my tendons for computing needs.  I ordered this air cleco installation tool bad boy at Avery (Update 17-Dec-15:  The Avery family retired and the business was subsequently shut down).

Update 1-Apr-13:  This part originates from Pan American Tool Corporation and is nearly 33% cheaper there.  Cleaveland also carries this tool for roughly the same price as Avery.


Turns out Ed has a great demo and shares his very similar thoughts on the need for this tool.

Total tool cost thus far:  $2,662.89

Also, today I decided to order Vans' practice toolbox kit.  I'm still not feeling confident in my metalworking skills just yet.  It will be here Friday along with the new grinder.  I'll start that after I'm done with project 2 (the control surface).

14 March 2013

Shop: Dimpler platforms.


Today I finished the dimpler platforms.  I departed from the usual design and made two separate supports on stilts.  We'll see if going against years of collective experience was a good decision.

My house had some leftover carpet in the basement, so no need to waste money there.  I used outdoor carpet glue on the surface with 80 pounds of weight pushing down overnight whilst it dried.  I had to buy a staple gun to wrap the carpet edges around the platforms. The electric one costs just as much as the manual one.  Might as well reduce my workload!

As you can see, I went with the DRDT-2.  This thing is very well built.


Total time spent on dimpler setup and platforms, also including drill press assembly and grinder mounting:   10 hours, 28 minutes.

12 March 2013

Shop: Table 4.

This table used some wood that I cut with the circular saw so a few of the cuts weren't perfect.  It has a few millimeter depression in the center which I could shim out if it ever became a problem.  That's okay: I really only need two perfectly level, same height tables.  This fourth table is intended to support the dimpler and its platform. 

You can see the Van's practice project laid out on the last image.


3 hours, 40 minutes.

11 March 2013

Shop: Table 3.

This one came out perfect too.  Having two other tables to support my work was so much easier on my back and legs than having to do all of this on the floor.

\

3 hours!  Getting better at these.  

I did have to get some more 2x4s today since I made some mistakes initially when learning how to be a carpenter.  I had intended to only make three tables, but it's clear I need at least 4 with all these tools.  I can still make another smaller table out of the leftover plywood if I need to.  Not sure what I'll be up against when building the wings.

10 March 2013

Shop: Table 2.

This table came out perfect!  Amazing what good cuts will do.


4 hours, 40 minutes.  I hooked up the Sioux DR1412 air drill to avoid having to swap out screw and drill bits.  Sounds like an auto garage in here!  The compressor cycled briefly after each hole.  That's livable.