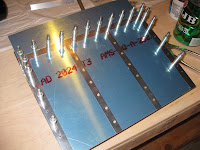
Time to make the practice control surface.
Had my first experience drilling out rivets since I got too excited and riveted the reinforcement plates to the spar without the ribs. D'oh! It caused me to bend some of the pieces and ream out the holes to a larger diameter. So a potential space between parts became an actual space. When banging the new rivets, their shop ends graciously filled that space preventing things from sitting flush. Oh well. Better to learn now than later.
Also, it's really dang hard to use the Main Squeeze and keep the factory end of the rivet flush to the work. Takes some planning on your part. If you screw it up (and by "you", I mean "me"), you get a rivet that lives in places it shouldn't. I'm guessing I'm going to end up with a pneumatic squeezer to save my hands and to help keep things properly aligned. Turns out, those bad boys are pricey though.
I really need some rubber pads on my vice. The vice chews through anything that's put in it. You can see some of the clamping marks on the spar. And if you're curious what the pretty mark is on the reinforcement plate, that was from my band saw. I wanted to see if slicing off a rivet head using that machine was practical. Turns out it works pretty well...if you're not concerned with anything else that the blade will touch. So, not an option for true work.
Note: Don't drill through the length of the rivet when trying to remove it. Drill a hole in the head and see if you can push it off with the drill bit. If not, bang the edge of a file against the head with a hammer. It will pop right off. Then use a punch to hammer out the body. Speaking of which, I really ought to get a punch. I was using a thin allen wrench as a punch. Shhh!
Pages I consulted during this project are below. Thanks guys!
- http://vitsrv.blogspot.com/2012/12/rv-training-project.html
- https://web.archive.org/web/20130301013146/http://www.etigerrr.com/ClassTutorial.htm
- I wish had found this page prior to starting. I came upon this page when trying to learn how to use the rivet squeezer. I appreciated the methodology used with the tin snips. My approach left a nasty, ratted-out edge.
So far up to 6 hours and 6 minutes on this project.
Other entries for project 2 are here and here.


No comments:
Post a Comment