
I joined the non-rarefied "Cracked My Wheel Pant Club". I was in a stiff crosswind and hit harder than I would have preferred on the left main. I was gusted into a right bank and overcompensated to the left when I was just inches above the runway. I think that landing counted for five in the logbook.
The wheel fairing cracked as the tire expanded. The left image shows when it happened as caught by my tail cam (see my first flight post for insight into my camera setup). If you look closely, you can see that the right wheel has not yet contacted the runway. The left wheel has flattened out quite a bit. The right image is the aft fairing half. No pieces were lost, thankfully.


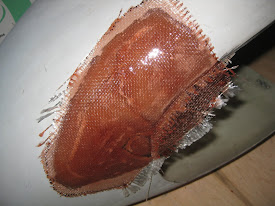

Looking towards the light at this stage, you can see the original damage.

The peel ply was removed from the exterior following cure (left). Which was then sanded down for a nice smooth finish (right). And I opened up the hole just a little bit to try to avoid a repeat of this damage in the future.


Next, I applied a liberal coat of Evercoat Easy Sand filler to fill the pin holes and support a smoother transition between the original part and the new exterior ply.

After some sanding work (left), it seemed nice following the high build primer (right).


But, it felt too mottled to me, so I sanded it back down, this time with a sanding block (which I should have done originally) then reprimed it.

The wheel fairing cracked as the tire expanded. The left image shows when it happened as caught by my tail cam (see my first flight post for insight into my camera setup). If you look closely, you can see that the right wheel has not yet contacted the runway. The left wheel has flattened out quite a bit. The right image is the aft fairing half. No pieces were lost, thankfully.


Following this approach, I temporarily glued the area together with a cyanoacrylate adhesive so the wheel fairing could hold up to the next step.

I then sanded the inside area smooth and exposed the underlying glass so the new glass plies will have something to grab on to (left). Next I wiped in an epoxy-flox mixture to fill the cracks and provide extra strength (right).


Then I wet three plies with an epoxy resign mixture. This is #7500 fiberglass cloth (0.014" thickness, 16x14 thread count), the kind I used any time cloth was called for throughout the build (mostly the canopy fairing).

I laid the first ply (left) and the second ply (right).


Then the third ply, with two additional smaller plies to cover the middle area better (left). I then put on some peel ply to help draw the resin through and give it a smooth texture (right).


Once that cured, I sanded down the exterior surface.


Then put a little bit of epoxy-flox into the cracks on the outside (left) and troweled it in (right).


Next, I put an epoxy resin wet ply on the outside (left) followed by peel ply (right).


Looking towards the light at this stage, you can see the original damage.

The peel ply was removed from the exterior following cure (left). Which was then sanded down for a nice smooth finish (right). And I opened up the hole just a little bit to try to avoid a repeat of this damage in the future.


Next, I applied a liberal coat of Evercoat Easy Sand filler to fill the pin holes and support a smoother transition between the original part and the new exterior ply.

After some sanding work (left), it seemed nice following the high build primer (right).


But, it felt too mottled to me, so I sanded it back down, this time with a sanding block (which I should have done originally) then reprimed it.

Back on the airframe it goes, ready for duty!

