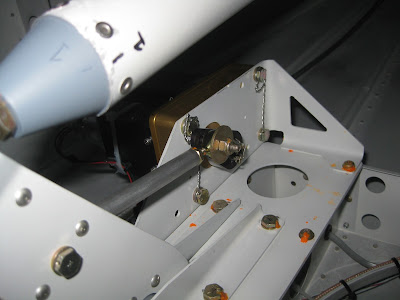
Quick post to show the elevator trim wire being wrapped. Seemed like a good idea to me as it appears it could move around in flight and bump up against the edges of aluminum. I used 1/8" AMP Spirap. The image below is shown with the F-01496 Empennage Fairing removed.
27 March 2018
26 March 2018
Painting: Fairings preperation.
I'm not certain when I'll have the aircraft painted, or for that matter, what the paint scheme shall be. To help prevent or slow UV damage to the fairings, I decided to prime the removable ones (I'll do the tip fairings and cowl halves later). However, before doing so, the pin holes needed to be filled prior to priming. My friend helped me significantly with this process.
First I purchased a cheap orbital sander with extra 120 grit paper. This was used to aggressively scuff the fairings. The fairings were then thoroughly cleaned.
Then we purchased Evercoat Easy Sand filler from the local autobody paint supply house. The Easy Sand was mixed and ready to be applied with a spreader.
Judiciously spreading the putty over the fairings, the spreader was used to push the putty into the surface to fill the holes and then to remove excess.
Once the putty dries (which is in about 20 minutes), 200 grit paper was used to sand the surface back to smooth. You can see all the pin holes that were filled.
Then we applied a high build primer from the auto body store (we first tried a can of Rust-Oleum - it was awful). Below is an image following the first round of sanding, filling and priming. You can see just how many pin holes remained. We had to do three rounds before we got all (we hope) of the pin holes.
Next, I had to do the same for the S-606A Spinner Gap Fillers. Of course, those are riveted on to the S-602-1 Spinner Plate, so the area needed to be masked off to prevent the putty and primer from sticking to things they shouldn't. The image on the left is after the putty was applied. The image on the right is following application of the high build primer.
Here is the final result with the S-601-1 Spinner reinstalled.
25 March 2018
Modification: Rear window sealing.
On 23-Mar-18 I had occasion to fly through rain for the first time. I appreciated the free "plane wash" as the smudges on my windscreen faded away into the sky. Thankfully, back on 16-Jan-17, when I installed the rear window, I sealed the joint between the rear F-14126 Window and F-01475 Aft Fuse Top Skin.
But, twenty minutes following the rain, I had the plane back in the hangar. I found that water had worked its way in-between the rear window and the roll over structure. I decided to seal that area with siliconized latex caulking (which dries clear and is paint-friendly). This is the same material I used to seal my antennas, as recommended by the EAA.
After the water evaporated (a quick process here in Colorado), I masked the area with tape.But, twenty minutes following the rain, I had the plane back in the hangar. I found that water had worked its way in-between the rear window and the roll over structure. I decided to seal that area with siliconized latex caulking (which dries clear and is paint-friendly). This is the same material I used to seal my antennas, as recommended by the EAA.
Then deposited the caulking.
After smoothing it down with my finger, I pulled the tape then left the canopy open over night.
The next day, it was clear and did not interfere with the canopy when closed.
14 March 2018
Maintenance: Replacing roll servo shear screw and re-rigging.
My GRT roll servo kept slipping in smooth, level flight. This was even with the (electronic) torque setting at its highest. Eventually, the servo sheared its own shear screw in flight. So I took the opportunity to start a conversation with GRT about what the issue might be. That conversation led me to send in my servo to have it checked out by their technician. It was returned to me stating that it was functioning properly.
After I received my servo back from GRT, I decided to remove the sheared shear screw. It's a 6-32 screw, so I drilled it out with a slightly smaller drill bit (left) then used a tap to work out the remaining material (right).
Next, I decided to try attaching the servo control rod to the servo arm in the middle hole. This affords more torque but less throw, as shown below. In flight, the roll servo slipped less but slipped none-the-less. So I finally connected the control rod in the minimum throw/maximum torque location (ensuring that the control rod length was adjusted to provide proper servo shaft angles). In flight, the servo rarely slips. I am still trying different gain and damping settings. I hope to "tune out" the slipping as it seems to slip mainly in turbulence now.
I had to do the same with the pitch servo (below) aft it slipped in flight when trimmed properly (boy did that wake me up!). Right now I am flying it on the middle hole of the servo arm.
As an aside, I'm not sure why the roll servo slips at all. It's the high torque version that GRT provides for the RV-10. That airplane has the same wing as the RV-14 and apparently has heavier roll control. The few blogs I've been able to find of GRT-equipped RV-10s all show their roll servos with the maximum throw/minimum torque setup. To my knowledge, I'm the only RV-14A flying behind GRT.
Subscribe to:
Posts (Atom)


