Showing posts with label 18 Fuel Tanks (Redo). Show all posts

02 July 2014

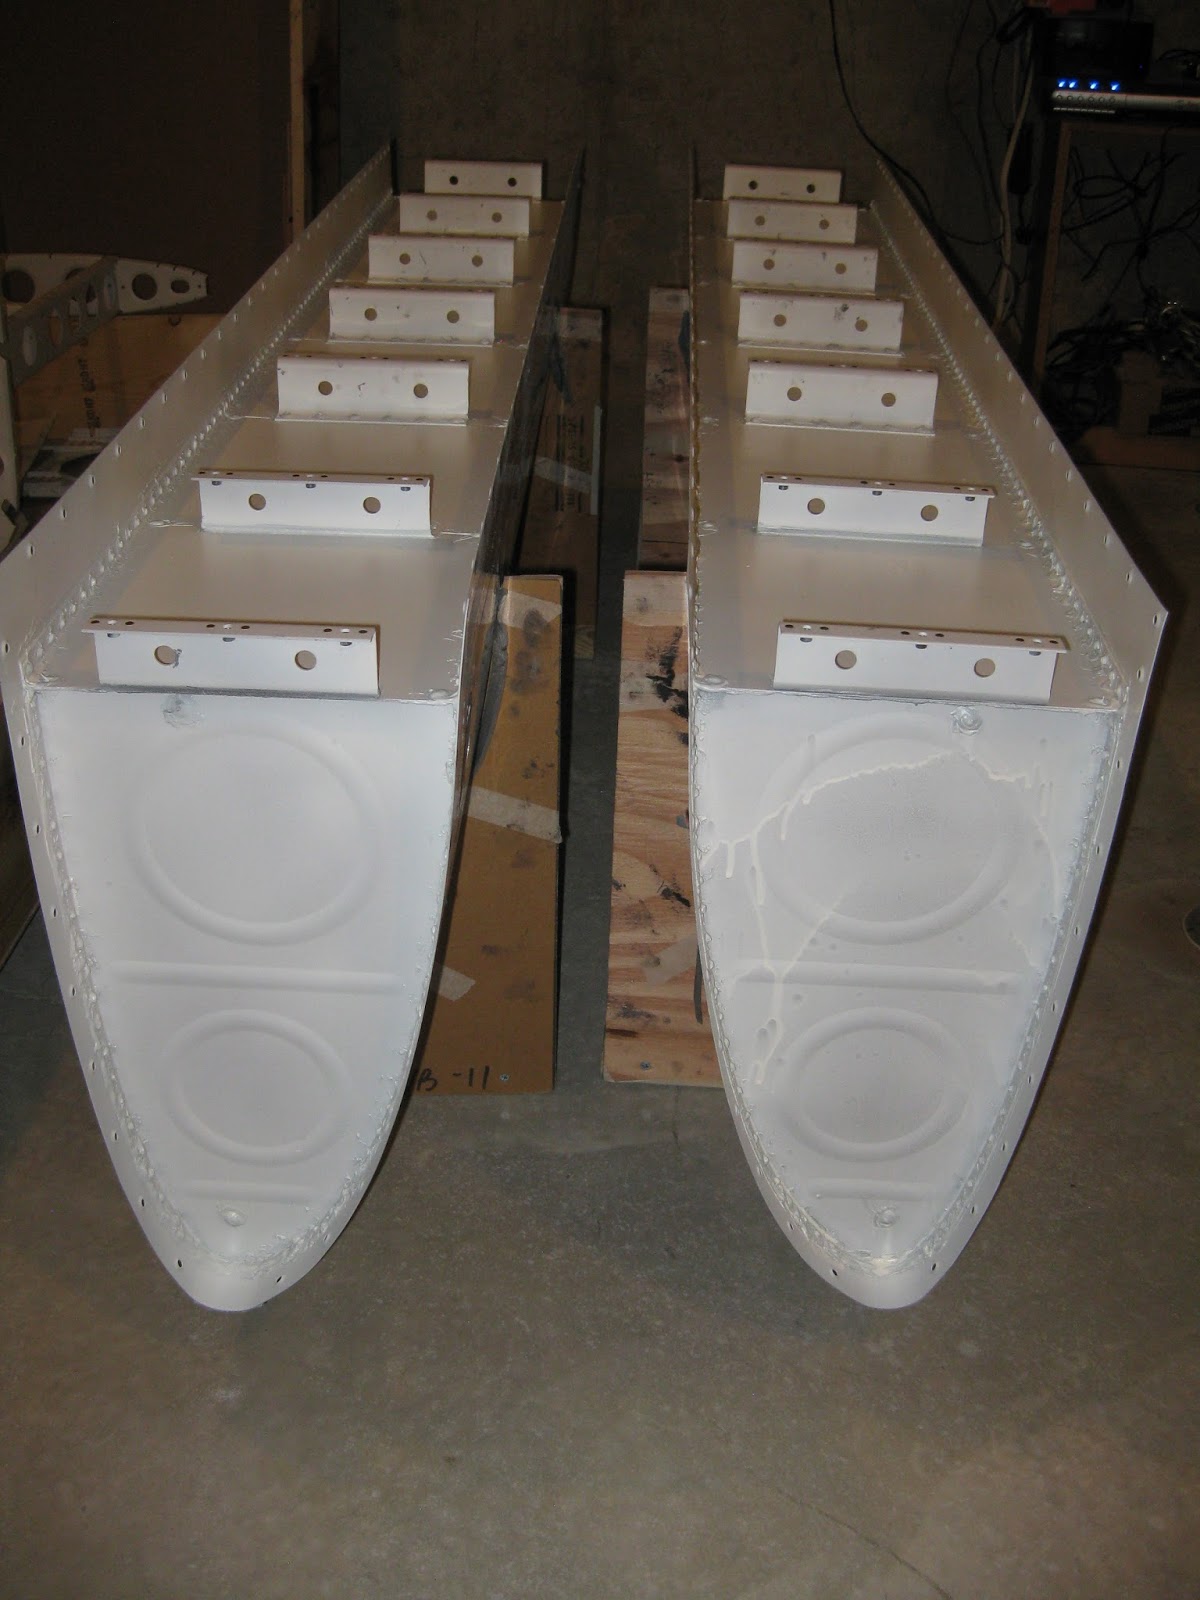
Wings: Fuel tanks redo. Old tanks dropped. Replacements mounted.

Because I'm redoing my fuel tanks, I'm really only posting progress reports rather than additional details.  See here for why I'm redoing my tanks.  Technique details on the original fuel tanks are found in their associated posts.
It took 5 hours to remove the original tanks and mount the new ones.  I shudder at the thought of doing this with the wings bolted onto the fuselage (Update 4-Sep-17:  I ultimately had to do that...and shudder I did).  We (my -9A friend and I) took off the aileron pushrods to make things easier.  All bolts were replaced.  The exterior screws will be replaced after the wings are painted.

Here's the left wing without its tank.  Contrast the below with a similar image when the bottom skins were off.  Then contemplate how easy mounting the tanks were back then!


So now the old tanks live in the garage next to their scrapped horizontal stabilizer brother.  I am entertaining suggestions on what to do with these non-flightworthy parts.  Ideas?


30 June 2014

Wings: Fuel tanks redo. Primed their exteriors.

Because I'm redoing my fuel tanks, I'm really only posting progress reports rather than additional details.  See here for why I'm redoing my tanks.  Technique details on the original fuel tanks are found in their associated posts.
Why not prime the exteriors of the tanks once verified as non-leaking?  And who cares if the primer makes a mess because the spray volume wasn't properly adjusted?


28 June 2014

Wings: Fuel tanks redo. Leak testing complete.

Because I'm redoing my fuel tanks, I'm really only posting progress reports rather than additional details.  See here for why I'm redoing my tanks.  Technique details on the original fuel tanks are found in their associated posts.
Both fuel tanks don't leak.  Mostly.  The right tank had a small leak at the ground screw on the sender.  The left tank had the same leak plus another on an adjacent screw.  I fixed the leak on the adjacent screw with some Loctite (removed screw, dressed threads, rescrewed).  I'll do the same on the ground screws once the tank is mounted and connected to the wires.  I'll probably dress each screw with some sealant where it contacts the sender plate, just to be safe.

Here is testing in progress.  Used a cup of very soapy water and a brush to "paint" the soap on every rivet and seam looking for bubbles.


Here's one of the leaky screws on the left tank.


No leaks on the right baffle.


And here's a little tip that's great.  Out-of-the-box, the fuel caps don't make a good seal with the fuel flanges.  On my first tanks, I simply duct-taped the heck out of the area to keep the tank pressurized whilst I checked elsewhere for leaks.  However, there is a small nut on the underside of the cap.  You turn that nut to control the tigthness of the seal.  Each of my caps needed about a full turn.  No leaks!  Many thanks to my blog reader Ken for giving me this tip!


Still using my locking caps.

22 June 2014

Wings: Fuel tanks redo. Baffles sealed.

Because I'm redoing my fuel tanks, I'm really only posting progress reports rather than additional details.  See here for why I'm redoing my tanks.  Technique details on the original fuel tanks are found in their associated posts.
On these tanks, I decided to dimple the skins and baffles rather than countersink despite the plans suggesting the latter (here is one reason why the plans state to countersink). Turns out, the dimpled baffle slid right in without issue.  I didn't have to pull the skins apart at all.  The bead sits nicely against the holes as seen on the left tank on the outboard edge.  Compare with the (very generous) bead on my original tanks, which have countersunk holes.  How did I get such a beautiful bead on these tanks, as shown below?  Read here.


A peek inside the fuel flanges of the left (top) and right (bottom) tanks.  You can see on the right tank, I had included two beads on the outboard rib, #7 (bottom left image).  The second bead was ultimately superfluous.  In each image, up is looking aft (to the baffle web).  So on the right tank, left is outboard and on the left tank, right is outboard.  On the sixth rib of each tank, you can see one of the screws with a Tinnerman washer and spacer holding the respective capacitive plate.


And no need to shave down the prideful rivets due to poorly cut countersinks, as I did in my original tanks!  All baffle rivets are nice and flush.  Below is the right tank's baffle rivets.  Left is outboard top, right is inboard bottom.


14 June 2014

Wings: Fuel tanks redo. Capacitive plates installed. Tanks passed water test.

Because I'm redoing my fuel tanks, I'm really only posting progress reports rather than additional details.  See here for why I'm redoing my tanks.  Technique details on the original fuel tanks are found in their associated posts.

Capacitive plates installed (see here for how these were fabricated on the original tanks).  I feel like I did a much better job than on my first tanks.  Right tanks on top.  Left tanks on bottom.  Just need to tack seal a couple of places along the wires before I call this "done".


Tanks passed the water leak test, save for some leakage around the float sender's hex screws for both tanks, which is an easy fix.  I took the same approach as I did for the first tanks, just no food coloring or toilet paper.

17 May 2014

Wings: Fuel tanks redo. Getting sealant under the J-stiffener and attach bracket.

Because I'm redoing my fuel tanks, I'm really only posting progress reports rather than additional details.  See here for why I'm redoing my tanks.  Technique details on the original fuel tanks are found in their associated posts.
Once the J-stiffeners are in place, it's worth checking the underside (which is the ship's forward side) with an inspection mirror to make sure enough sealant squeezed out during installation.  If not, it's hard to get under there to apply more sealant.  On my original tanks, I loaded up sealant on my gloved fingers and tried to spread it around.  Rather than going where I wanted it to, it mostly went everywhere else.  This lead to a lot of extra sealant being used (as an aside, it will be interesting to weigh the new tanks and compare them to that of the old tanks).

Turns out, to accept a nozzle, the Techon cartridges I use with my Semco gun (left) have a 1/4" threaded female fitting.  A quick trip to Lowe's found me these nice 90 degree 1/"4 male elbows (right) with barbs on the end.  The aperture size is perfect for sealant application.


As a demonstration, you can see it fits the gun perfectly and easily sneaks sealant under the J-stiffener (and the tank attach brackets too).  A quick run of the Popsicle stick spreads the applied sealant out nicely.  In fact, I see no reason why a short length of 1/4" tubing couldn't be used for a unidirectional nozzle.  Maybe I'll try that on my next, next set of tanks!


12 May 2014

Wings: Fuel tanks redo. Ribs and stiffeners riveted.

Because I'm redoing my fuel tanks, I'm really only posting progress reports rather than additional details.  See here for why I'm redoing my tanks.  Technique details on the original fuel tanks are found in their associated posts.
I solo riveted the left and right tank ribs without too much fuss.  My arms are barely long enough to reach the nose rivets, as the bruises on my upper arm will attest to.  On the left tank, I foolishly riveted in the aft inboard rib assembly before putting in the J-stiffener.  That was fun drilling out the associated rivets and cleaning up the sealant mess. However, in doing so, I came up with a new technique for removing rivets (new to me anyway).  See the bottom*.

Right tank in progress.


 Left tank in progress.


After riveting was complete, I checked over the exterior and found this at the 3rd rivet aft (centered in image) on the forward inboard rib of the left tank.  This is the first cracked rivet head I've yet seen in the build (I find it rather coincidental that there is a very minor gouge in the skin at the same point).  Makes me wonder if there was some detritus on the squeezer die that got mashed into the head causing the split.  It's clear from the image that the adjacent rivets share many of the same marks in the skin from the squeezer.  Also, a piece of aluminum was squashed into the skin above the center rivet. 


When I removed this rivet, I was surprised to see that it was under-squeezed.  I got concerned and looked at the shop heads of the other squeezed rivets and they seemed just fine.  The fact that this rivet alone was under-squeezed seems to be further evidence that my squeezer die had material stuck to it when this rivet was squeezed.

*To remove AD3s, I typically use my punch to make a nice dimple in the rivet.  Then I use a #52 to start a small hole, then a #42 to drill down the depth of the head.  Then I use my pin punch to snap the head off.  However, now I drill the #52 hole down quite deep, beyond the head and a ways into the shaft.  Then, with the #42 in the drill, I go very slowly into the #52 hole and in about 2 turns the head usually snaps right off when the bit's tip starts biting into the head.  Now, for the times when the head doesn't snap off, I drill the #42 down through the head as usual, then use the tail of a #40 to snap it off.  Because the #40 is a slightly larger bit, it fits very snug in the hole.

09 May 2014

Wings: Fuel tanks redo. Stiffeners, cap and drain flanges fay sealed and riveted.

Because I'm redoing my fuel tanks, I'm really only posting progress reports rather than additional details.  See here for why I'm redoing my tanks.  Technique details on the original fuel tanks are found in their associated posts.
First off, the Semco gun rules!  It's fast, my forearms don't get blown and it's a lot cleaner to work with than my original syringe gun approach.  The Semco gun still has a slight after-discharge when the trigger is released, but it's manageable.

On the original tanks, I back-riveted the stiffeners.  This time I directly riveted them with the mushroom set and Mr. T.  This method is easier and I didn't feel like I gained much, if anything, in terms of aesthetics with the original tanks.

Mid-riveting process.


Left drain and cap flange rivets.


A completed stiffener.


Looking down the left and right tanks.  So far, they are so much cleaner than my original tanks.


02 March 2014

Wings: Fuel tanks redo. Riveting sender nutplates.

Because I'm redoing my fuel tanks, I'm really only posting progress reports rather than additional details.  See here for why I'm redoing my tanks.  Technique details on the original fuel tanks are found in their associated posts.
There are five nutplates for each fuel level sender that must be attached to the inboard rib of each tank.


Six of the ten rivets holding these nutplates are easily reached using a squeezer with a standard 3" deep yoke.  The forward most 4 rivets must be reached with a deeper yoke, such as a 4".  Barring that last yoke, these four rivets can be back-riveted with a dumbell bucking bar.  Just make sure the curvature of the dumbell doesn't overlap that of the rib, otherwise the rib's "bump-out" will be deformed.

Setting up the bucking bar on the manufactured heads.  The cleco pliers is to balance the rib so it doesn't fall over.


Here the bucking bar is set so the rivet in the upper right is ready for bucking.


Bucking.


In the image above, you can see my capacitive plates in the process of being formed.  And on the rib, you can see the additional holes for the capactive plate (fabrication & installation on original tanks) BNC connector as well as for my low level optical fuel sensors (spec'ing & installation on original tanks).

I actually didn't remember how I set those forward four rivets on my first tanks.  I had to review my fast-motion video from July of last year to see how I managed those.  See here for information on that setup.  Though I don't post the videos, I do post images from that camera from time-to-time (they're the ones with the bird's-eye view perspective like the above).

03 February 2014

Wings: Fuel tanks redo. Delivery.

Because I'm redoing my fuel tanks, I'm really only posting progress reports rather than additional details.  See here for why I'm redoing my tanks.  Technique details on the original fuel tanks are found in their associated posts.
60x23x8 inches at 80 pounds.  The contents of this wonderful box represent an extraordinary piece of mind.


An ingenious methodology to the securing of sealant for shipping.


They cut the 60" J-stiffeners to fit in the 60" exterior length box.  Inside length of the box is 59" and the required length of the stiffeners for the tanks is 54".  Unfortunately, they cut the stiffeners to 52" (with shears no less, so the edges are warped).  Initially I thought I could just overlap two stiffeners to make up the 54" length, as is done in the wings, but then thought it would just be an invitation for later potential leakage.  I will discuss with Van's to see if they'd be amenable to replacement.

Shop: Bought a Semco sealant gun.

When I sealed my original fuel tanks (see here for why I'm redoing them), I used a $77 manual syringe gun (it's much cheaper on eBay, should have checked there first!).  It made things much easier than using Popsicle sticks and cotton swab stems.  However, it was hard on the forearm muscles and would continue to dispense after releasing the trigger.  Also, the 1 ounce syringes weren't realistically reusable, though at $0.62 each, that wasn't too much of an issue.


Turns out, one can find used Semco guns on eBay for much less than I bought my syringe gun for.  So, I picked up a used Semco model 250-A sealant gun for $30.  When done, I can probably turn around and sell this for what would essentially be a wash.


Mine comes with a 2.5 ounce container which is more than what I had with my syringe gun, so I'm thinking that I could buy a few 2.5 ounce cartridges and nozzles, fill them up with sealant as needed through the day and use them.  The next day I can easily pull the partially cured sealant out of the cartridges and reuse them.  I did something similar with the syringe gun to clean it.  Sealant does not stick to smooth plastic very well so it just peels off.

Stay tuned to this post to find out if Techon cartridges, plungers and nozzles work.  They're much cheaper than Semco's and look like they're the same shape.  Update 12-May-14:  I have verified that these do work with this gun.  Update 17-May-14:  And this elbow makes getting into crevices a breeze.

28 January 2014

Wings: Fuel tanks. Doing them over.

My fuel tanks tested leak free, both left and right.  But there was one thing that bothered me so much, that I decided to scrap these completed tanks and make news ones:  The skin-to-baffle countersinks.

First issue was that those countersinks were too shallow.  They were just on the hairy edge of being at the 0.006" proud spec for shaving.


I went ahead and shaved them all with my shaver back in October of 2013, figuring I'd probably do the tanks over in the future anyway.


The bigger concern was that the holes in the skin were excessively elongated (they went down to a "knife-edge" but that may be unavoidable with a skin thickness of 0.032") as I wasn't very careful with keeping the drill speed slow.  I hadn't noticed the issue until after I was done sealing the baffle.  So, though I don't know if the corresponding baffle holes also got elongated, I had to assume they were.

Now, the plans initially have you skip countersinking every 10th hole to help keep things aligned.  The holes that you skip get countersunk after the baffle is sealed in.  This meant that I could rummage through my image library and possibly find illustrative images with the non-countersunk holes to see how they compare to the countersunk ones.  Two such images are below.  You can see which holes were skipped (highlighted in red) by their smaller radius.  That's the radius appropriate for an AD3 rivet.  The larger holes were too big. 


The two images of the baffle holes I found (not shown) didn't show evidence of elongation.  Under the assumption that the baffle holes weren't elongated, this is what the squeezed, set rivets would probably look like (pardon my poor computer art skills).


I also wasn't confident that the AD-42H pop rivets holding the tank attach zees were properly pulled.  Here's an image from inside the tank (looking through the filler flange).  The heads didn't look consistent to me.  I may not have been pushing down hard enough on the rivet puller when setting these rivets.


Perhaps I'm being too conservative, however I just wasn't comfortable with these outcomes.  So I shelled out the $1223.90 for replacement tanks.  For the second build, I will:
  1. Dimple, rather than countersink, the skin-to-baffle holes (being deliberate with my sealant use to ensure the baffle seals).  There is successful precedent for this (here is the reason for using the countersink approach).  It would be a stronger joint and avoid the pitfalls of dirty countersinking.  Apparently it's important to use reduced diameter dies on the baffle to avoid distorting the flange.
  2. Rivet the flange bearings last to ensure access to all rivets on the tank/rib assembly.
  3. Avoid missing a dimple.
  4. Avoid needing an AD5 rivet.
  5. Seat the AD6 rivet filling the outboard rib tooling hole so that the adjacent AD4 rivet can be fully set.
  6. This time, I will not use deeper dimple dies.  There's an interesting thread about this
  7. Do a better job routing the capacitive probe wires.  I thought they were too loose.
  8. Do a better job shaping the fuel float wires.  I had to buy a second set on the first run and they ended up with slightly different deflection extrema on each side.
  9. Generally, apply the sealant more cleanly (example of poor aesthetics can be found on the third picture above). A sealant gun should help here (purchased 3-Feb-14).
  10. Continue using the fay seal technique as described here
  11. Update 26-Feb-15:  If I were ever to do a third set of tanks, after sealing the mating surfaces, I would not shoot the rivets wet. I would remove the sealant from the dimple, buck/squeeze the rivet then dollop the shop head.  Apparently even Van's doesn't shoot their rivets wet and doesn't seal in the shop heads in QB kits (read whole page 15).  At least, that's how I construe the conversations in those two links.
Click here to follow my fuel tanks redo in reverse chronological order.