GRT EFIS Audio Alerts
Update 7-Nov-24: Filled in missing alarms as provided by GRT.
Update 15-Mar-23: Added alarm #289.
Update 16-Apr-19: Added alarm #288.
Executive summary: At least 80 undocumented audio alerts are
available on most GRT EFISs. This post explains what they are and how
to enable most of them.
Background
The GRT
HXr,
HX,
Sport and
Horizon EX,
Sport SX,
Mini-GA and (I think)
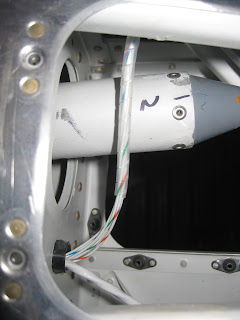
Mini Series EFISs have an audio output to provide audio alerts to your intercom using audio files that you must provide. The output is found on pin B24 with
ground on B25 for all but the Minis. GRT has disclosed only 17 special alerts which use
predefined filenames (shown in parentheses below) which are typically copied on to the EFIS from a USB drive using the
Set Menu on the EFIS:
- Minimum oil pressure (oil_pressure.wav)
- Minimum fuel pressure (fuel_pressure.wav)
- AoA tone near stall, repeats more frequently closer to stall (filename unknown)
- Obstacle alarm (obstacle.wav)
- New traffic within alert criteria (traffic.wav)
- Autopilot disconnect
- Manual (ap_disconnect_advisory.wav)
- Automatic(ap_disconnect_warning.wav)
- Maximum oil temperature (oil_temperature)
- Maximum CHT (cht.wav)
- Low/High voltage (low_volts.wav and high_volts.wav)
- Maximum fuel flow (fuel_flow.wav)
- Vne exceeded (speed.wav)
- Trim alert from GRT pitch servo, repeats every 30 seconds (trim.wav)
- SAP height above runway at 500, 200, and 100 feet (500.wav, 200.wav,1500.wav)
- Minimums if decision altitude is set (minimums.wav)
- Approaching minimums when 200 feet above decision altitude (approaching_minimums.wav)
- Waypoint sequence (waypoint.wav)
First, it's helpful to understand how the EFIS alert annunciation process works.
Short version:
- Alarm occurs.
- EFIS looks for associated file.
- EFIS plays the file.
Long version:
- Alarm occurs with unique internal four-digit alarm number..
- EFIS looks for the associated alarm####.wav or predefined file in the Alerts folder first on the USB drive, then on the EFIS itself.
- If the file is found, it is played.
- If there are duplicate files then the USB file is played first, immediately followed by the EFIS file resulting in a double alert.
- This would occur with the predefined special alarms like obstacle.wav which is also alarm0091.wav.
- To avoid double alerts, don't provide both files.
- For example you may have already placed obstacle.wav on your EFIS, so don't provide alarm0091.wav also unless you want to hear both wav files: "obstacle, obstacle".
How to Add Your Own Voiced Alerts
You can find the undocumented alarms in the table shown below in the section "
Alarms I Have Identified". Here are the steps to expand your voiced alarms on your EFIS:
- Decide what message you want your EFIS to voice for each
alarm you're interested in having.
- Create the voices using an online text-to-voice service.
- Save each message with the proper filename (alarm####.wav - must use four digits).
- Copy your new alarm####.wav files onto your USB drive into a folder named Alerts.
- Plug the USB drive into your EFIS.
- You're done. Verify it works on the ground with engine off, prior to flight.
- You can copy your alerts to your EFIS by going into the Set Menu -> General Settings -> Audio -> Copy Alerts. Any wav files currently on the EFIS are deleted prior to the news being copied over. Do not exceed 100 MB to copy over.
- Consider carrying the full set of alarm files to help identify additional alarms as explained in the "Files You Can Use for Alerts" section below.
Additional items to consider:
- If you decide to copy your alarm files to your EFIS, your collection of selected audio files should not exceed 100 MB in size as the EFIS will not copy more than that. If you find yourself bumping up against that threshold, decrease the sampling rate of your files.
- Keep in mind that the EFIS will play the entire file when the alarm triggers, so very terse messages are probably best.
- For example, "hey, pilot in command, your cylinder head temperature on cylinder 2 is too high, do something about it!" is not a wise choice for alarm 76.
- Not all alarms get a preceding tone (a "blip" or "whoop"). If you want
your alarms to have a preceding tone, you may need to add the tone to
the wav file you plan to use.
- My AUX inputs probably don't match yours. Be sure to use messages that match your configuration.
- I make mistakes.
Alarms Identified
If you find additional alarms or errors,
contact me. Thanks to user "R" for finding several additional alerts and finally, thanks to GRT for sharing the full list.
Columns:
- Alarm: Alarm number (remember, the number in alarm####.wav needs to be four digits).
- Message: My suggested voice message for the alarm. You can use something different if you prefer.
- Note: Your AUX inputs are probably different than mine so you will need to change the associated messages to match your configuration.
- Description: What the alarm represents.
- Predefined: If it is also a predefined alarm, the associated special filename.
| Alarm |
Message Used |
Description |
Predefined? |
| 0 |
Avionics data, unavailable. |
Serial and EthLink no data |
|
| 1 |
|
AHRS1 align |
|
| 2 |
Flight time limit |
Flight time limit |
|
| 3 |
Interval elapsed |
Interval alarm |
|
| 4 |
Fuel flow |
Fuel flow too high |
|
| 5 |
Oil pressure high. |
Max Oil Pressure |
oil_pressure.wav |
| 6 |
Oil pressure, low. |
Min Oil Pressure |
oil_pressure.wav |
| 7 |
Cruise oil pressure low |
Cruise oil pressure low |
|
| 8 |
Oil temperature high. |
Max Oil Temp |
|
| 9 |
Oil temperature, low. |
Min Oil Temp |
|
| 10 |
RPM high |
RPM High |
|
| 11 |
RPM low |
RPM Low |
|
| 12 |
Total fuel low. |
Min Fuel |
|
| 13 |
Manifold pressure high. |
EIS1 Max AUX1 |
|
| 14 |
Left fuel tank high. |
EIS1 Max AUX2 |
|
| 15 |
Right fuel tank high. |
EIS1 Max AUX3 |
|
| 16 |
Alternator current high. |
EIS1 Max AUX4 |
|
| 17 |
Battery current high. |
EIS1 Max AUX5 |
|
| 18 |
Fuel pressure high. |
EIS1 Max AUX6 |
|
| 19 |
Manifold pressure, low. |
EIS1 Min AUX1 |
|
| 20 |
Left fuel tank, low. |
EIS1 Min AUX2 |
|
| 21 |
Right fuel tank ,low. |
EIS1 Min AUX3 |
|
| 22 |
Alternator current, low. |
EIS1 Min AUX4 |
|
| 23 |
Battery current, low. |
EIS1 Min AUX5 |
|
| 24 |
Fuel pressure, low. |
EIS1 Min AUX6 |
|
| 25 |
Coolant temperature high |
Max Coolant Temp |
|
| 26 |
Coolant temperature low |
Min Coolant Temp |
|
| 27 |
EIS voltage high |
Max EIS Voltage |
|
| 28 |
EIS voltage low |
Min EIS Voltage |
|
| 29 |
EFIS bus one voltage high |
Max EFIS Voltage Bus 1 |
high_volts.wav |
| 30 |
EFIS bus one voltage low |
Min EFIS Voltage Bus 1 |
low_volts.wav |
| 31 |
EFIS bus two voltage high |
Max EFIS Voltage Bus 2 |
|
| 32 |
EFIS bus two voltage low |
Min EFIS Voltage Bus 2 |
|
| 33 |
EFIS bus three voltage high |
Max EFIS Voltage Bus 3 |
|
| 34 |
EFIS bus three voltage low |
Min EFIS Voltage Bus 3 |
|
| 35 |
Carburetor temperature |
Carb temp too high/low |
|
| 36 |
Exhaust 1 temperature high. |
Max EGT1 |
|
| 37 |
Exhaust 2 temperature high. |
Max EGT2 |
|
| 38 |
Exhaust 3 temperature high. |
Max EGT3 |
|
| 39 |
Exhaust 4 temperature high. |
Max EGT4 |
|
| 40 |
Exhaust 5 temperature high. |
Max EGT5 |
|
| 41 |
Exhaust 6 temperature high. |
Max EGT6 |
|
| 42 |
Exhaust 7 temperature high. |
Max EGT7 |
|
| 43 |
Exhaust 8 temperature high. |
Max EGT4 |
|
| 44 |
Exhaust 9 temperature high. |
Max EGT9 |
|
| 45 |
Exhaust 1 temperature, low. |
Min EGT1 |
|
| 46 |
Exhaust 2 temperature, low. |
Min EGT2 |
|
| 47 |
Exhaust 3 temperature, low. |
Min EGT3 |
|
| 48 |
Exhaust 4 temperature, low. |
Min EGT4 |
|
| 49 |
Exhaust 5 temperature, low. |
Min EGT5 |
|
| 50 |
Exhaust 6 temperature, low. |
Min EGT6 |
|
| 51 |
Exhaust 7 temperature, low. |
Min EGT7 |
|
| 52 |
Exhaust 8 temperature, low. |
Min EGT8 |
|
| 53 |
Exhaust 9 temperature, low. |
Min EGT9 |
|
| 54 |
Exhaust gas temperature 1, increment high |
Max EGT 1 Increment |
|
| 55 |
Exhaust gas temperature 2, increment high |
Max EGT 2 Increment |
|
| 56 |
Exhaust gas temperature 3, increment high |
Max EGT 3 Increment |
|
| 57 |
Exhaust gas temperature 4, increment high |
Max EGT 4 Increment |
|
| 58 |
Exhaust gas temperature 5, increment high |
Max EGT 5 Increment |
|
| 59 |
Exhaust gas temperature 6, increment high |
Max EGT 6 Increment |
|
| 60 |
Exhaust gas temperature 7, increment high |
Max EGT 7 Increment |
|
| 61 |
Exhaust gas temperature 8, increment high |
Max EGT 8 Increment |
|
| 62 |
Exhaust gas temperature 9, increment high |
Max EGT 9 Increment |
|
| 63 |
Exhaust gas temperature 1, increment low |
Min EGT 1 Increment |
|
| 64 |
Exhaust gas temperature 2, increment low |
Min EGT 2 Increment |
|
| 65 |
Exhaust gas temperature 3, increment low |
Min EGT 3 Increment |
|
| 66 |
Exhaust gas temperature 4, increment low |
Min EGT 4 Increment |
|
| 67 |
Exhaust gas temperature 5, increment low |
Min EGT 5 Increment |
|
| 68 |
Exhaust gas temperature 6, increment low |
Min EGT 6 Increment |
|
| 69 |
Exhaust gas temperature 7, increment low |
Min EGT 7 Increment |
|
| 70 |
Exhaust gas temperature 8, increment low |
Min EGT 8 Increment |
|
| 71 |
Exhaust gas temperature 9, increment low |
Min EGT 9 Increment |
|
| 72 |
EGT span high |
EGT Span Too Large |
|
| 73 |
Cylinder 1 temperature high. |
Max CHT1 |
|
| 74 |
Cylinder 2 temperature high. |
Max CHT2 |
|
| 75 |
Cylinder 3 temperature high. |
Max CHT3 |
|
| 76 |
Cylinder 4 temperature high. |
Max CHT4 |
|
| 77 |
Cylinder 5 temperature high. |
Max CHT5 |
|
| 78 |
Cylinder 6 temperature high. |
Max CHT6 |
|
| 79 |
Cylinder 1 temperature, low. |
Min CHT1 |
|
| 80 |
Cylinder 2 temperature, low. |
Min CHT2 |
|
| 81 |
Cylinder 3 temperature, low. |
Min CHT3 |
|
| 82 |
Cylinder 4 temperature, low. |
Min CHT4 |
|
| 83 |
Cylinder 5 temperature, low. |
Min CHT5 |
|
| 84 |
Cylinder 6 temperature, low. |
Min CHT6 |
|
| 85 |
Cylinder 1 cooling fast |
EIS1 CHT1 Cooling Too Fast |
|
| 86 |
Cylinder 2 cooling fast |
EIS1 CHT2 Cooling Too Fast |
|
| 87 |
Cylinder 3 cooling fast |
EIS1 CHT3 Cooling Too Fast |
|
| 88 |
Cylinder 4 cooling fast |
EIS1 CHT4 Cooling Too Fast |
|
| 89 |
Cylinder 5 cooling fast |
EIS1 CHT4 Cooling Too Fast |
|
| 90 |
Cylinder 6 cooling fast |
EIS1 CHT6 Cooling Too Fast |
|
| 91 |
Obstacle |
Obstacle |
obstacle.wav |
| 92 |
Altitude deviation |
Check Altitude |
|
| 93 |
Analog input 1 too high |
|
|
| 94 |
Analog input 2 too high |
|
|
| 95 |
Analog input 3 too high |
|
|
| 96 |
Analog input 4 too high |
|
|
| 97 |
Analog input 5 too high |
|
|
| 98 |
Analog input 6 too high |
|
|
| 99 |
Analog input 7 too high |
|
|
| 100 |
Analog input 8 too high |
|
|
| 101 |
Analog input 1 too low |
|
|
| 102 |
Analog input 2 too low |
|
|
| 103 |
Analog input 3 too low |
|
|
| 104 |
Analog input 4 too low |
|
|
| 105 |
Analog input 5 too low |
|
|
| 106 |
Analog input 6 too low |
|
|
| 107 |
Analog input 7 too low |
|
|
| 108 |
Analog input 8 too low |
|
|
| 109 |
TIT 1 high |
TIT 1 high
|
|
| 110 |
TIT 2 high |
TIT 2 high
|
|
| 111 |
TIT 1 low |
TIT 1 low
|
|
| 112 |
TIT 2 low |
TIT 2 low
|
|
| 113 |
Terrain! Terrain! Pull up! Pull up! |
terrain
|
|
| 114 |
Insufficient power for climb |
No climb
|
|
| 115 |
RPM 2 is high |
RPM 2 high
|
|
| 116 |
RPM 2 is low |
RPM 2 low
|
|
| 117 |
N1 spool high |
N1 spool high
|
|
| 118 |
N1 spool low |
N1 spool low
|
|
| 119 |
N2 spool high |
N2 spool high
|
|
| 120 |
N2 spool low |
N2 spool low
|
|
| 121 |
CO guardian unit failure |
CO Guardian Unit Failure |
|
| 122 |
CO level unsafe |
Carbon Monoxide Level Unsafe |
|
| 123 |
Cabin pressure unsafe |
Cabin Pressure Unsafe |
|
| 124 |
Check bio data |
Life Guardian periodic bio data check |
|
| 125 |
Storm scope reset |
Stork scope reset |
|
| 126 |
Storm scope fault |
Stork scope fault |
|
| 127 |
Storm scope heading |
Stork scope heading |
|
| 128 |
Vertical Power fault |
Vertical Power fault |
|
| 129 |
RPM 3 high |
RPM 3 high |
|
| 130 |
RPM 3 low |
RPM 3 low |
|
| 131 |
N3 spool high |
N3 spool high |
|
| 132 |
N3 spool low |
N3 spool low |
|
| 133 |
Exhaust 10 temperature high |
EGT 10 high |
|
| 134 |
Exhaust 11 temperature high |
EGT 11 high |
|
| 135 |
Exhaust 12 temperature high |
EGT 12 high |
|
| 136 |
Exhaust 10 temperature low |
EGT 10 low |
|
| 137 |
Exhaust 11 temperature low |
EGT 11 low |
|
| 138 |
Exhaust 12 temperature low |
EGT 12 low |
|
| 139 |
Exhaust gas temperature 10, increment high |
EGT 10 inc high |
|
| 140 |
Exhaust gas temperature 11, increment high |
EGT 11 inc high |
|
| 141 |
Exhaust gas temperature 12, increment high |
EGT 12 inc high |
|
| 142 |
Exhaust gas temperature 10, increment low |
EGT 10 inc low |
|
| 143 |
Exhaust gas temperature 11, increment low |
EGT 11 inc low |
|
| 142 |
Exhaust gas temperature 12, increment low |
EGT 12 inc low |
|
| 176 |
Coolant temperature high |
Coolant temperature high |
|
| 177 |
Coolant temperature low |
Coolant temperature low |
|
| 253 |
|
Heading reference 1 |
|
| 254 |
|
Heading reference 2 |
|
| 255 |
|
Reserved |
|
| 256 |
|
Analog remote low 1 |
|
| 257 |
|
Analog remote low 2 |
|
| 258 |
|
Analog remote low 3 |
|
| 259 |
|
Analog remote low 4 |
|
| 260 |
|
Analog remote low 5 |
|
| 261 |
|
Analog remote low 6 |
|
| 262 |
|
Analog remote low 7 |
|
| 263 |
|
Analog remote low 8 |
|
| 264 |
|
Analog remote low 9 |
|
| 265 |
|
Analog remote low 10 |
|
| 266 |
|
Analog remote low 11 |
|
| 267 |
|
Analog remote low 12 |
|
| 268 |
|
Analog remote low 13 |
|
| 269 |
|
Analog remote low 14 |
|
| 270 |
|
Analog remote low 15 |
|
| 271 |
|
Analog remote low 16 |
|
| 272 |
|
Analog remote high 1 |
|
| 273 |
|
Analog remote high 2 |
|
| 274 |
|
Analog remote high 3 |
|
| 275 |
|
Analog remote high 4 |
|
| 276 |
|
Analog remote high 5 |
|
| 277 |
|
Analog remote high 6 |
|
| 278 |
|
Analog remote high 7 |
|
| 279 |
|
Analog remote high 8 |
|
| 280 |
|
Analog remote high 9 |
|
| 281 |
|
Analog remote high 10 |
|
| 282 |
|
Analog remote high 11 |
|
| 283 |
|
Analog remote high 12 |
|
| 284 |
|
Analog remote high 13 |
|
| 285 |
|
Analog remote high 14 |
|
| 286 |
|
Analog remote high 15 |
|
| 287 |
|
Analog remote high 16 |
|
| 288 |
Roll trim required |
Roll trim required |
|
| 289 |
Pitch trim required |
Pitch trim required |
|
| 290 |
|
AHRS2 align |
|
| 291 |
Cylinder 7 temperature high |
CHT 7 high |
|
| 292 |
Cylinder 8 temperature high |
CHT 8 high |
|
| 293 |
Cylinder 9 temperature high |
CHT 9 high |
|
| 294 |
Cylinder 7 temperature low |
CHT 7 low |
|
| 295 |
Cylinder 8 temperature low |
CHT 8 low |
|
| 296 |
Cylinder 9 temperature low |
CHT 9 low |
|
| 297 |
Cylinder 7 cooling fast |
CHT 7 cooling fast |
|
| 298 |
Cylinder 8 cooling fast |
CHT 8 cooling fast |
|
| 299 |
Cylinder 9 cooling fast |
CHT 10 cooling fast |
|
| 300 |
Manifold pressure high |
MAP high |
|
| 301 |
Manifold pressure high |
MAP high |
|
| 302 |
RPM range limit |
RPM range limit |
|
| 302 |
RPM range limit |
TachHi/Lo alarm |
|
*Note: "Traffic", "Speed", "Autopilot disconnect", G maximum limits and the "AoA" tone do not appear to have an associated alarm number.
Files You Can Use for Alerts
How You Can Help Identify Additional Alarms
I'm also giving this link which has the 10,000 alarm files that I assembled in a 318 MB 7z file that just voices
the number of the associated alarm (let's call these the
numbered alarms).
For example,
alarm1293.wav simply says "one thousand two hundred and ninety three". To decompress a 7z file you will need to use
7zip (for Windows) or
Keka (for Mac).
Why do I provide those numbered alerts files? If you use them, when your system triggers an alarm I haven't
documented yet (
e.g., I don't have three props, TIT sensor,
etc., so I don't plan to find what their alarm numbers are), you'll hear the number and you can
contact me with the information so I can add it to the list.
To use these numbered alarms and still keep your messaged alarms:
- Copy the 10,000 numbered alarms onto
the USB drive's Alerts folder.
- Copy the messaged
alarm files.
- Overwrite the associated numbered alarms from Step 1 so you
still get the messages you want instead of hearing numbers.
- Delete
any file with an associated alarm you're not interested in hearing.
- For example
- Maybe you don't want to hear when your RPM gets
too low so delete alarm0011.wav.
- You already copied obstacle.wav to your EFIS so you don't need alarm0091.wav.
- Plug the USB drive into your EFIS.
- You're done. If you find additional alarms, please contact me.
The Process I Used To Determine Alarm Numbers
Short version:
- Created 10,000 wav files, each which voices the numbers 0-9,999.
- Placed them in the Alerts folder on a USB drive connected to the EFIS.
- Artificially caused as many alarms as I could.
- Wrote down the number I heard for each alarm.
- Noted duplicates (i.e., when predefined alarms were followed by a number too).
- Created alarm files with the messages I want to hear.
- Updated numbered alarm files with messaged alarm files.
- Keep numbered alarm files on USB drive to facilitate identification of alerts in the future.
Long version:
Armed with the file format, it was trivial to decode most of the alarms that were relevant to my installation and setup. All I needed to do was create 10,000 audio files that announce numbers, then each alarm would annunciate as a number and I could simply write down what each corresponded to.
So, to save myself the time of manually creating one thousand wav files
I downloaded pre-recorded number files (0-99, x00, x000). These represented only 118 of the files I need. I needed the remaining 9,882 audio files. But with those 118 files, I could use
ffmpeg and some simple basic DOS scripts that I quickly wrote to automatically create and assemble files "
alarm0000.wav" through "
alarm9999.wav" giving me the complete collection of 10,000 files, each of which annunciates the associated number. I further used
ffmpeg to ensure each had the file format Windows PCM, 44,100 Hz, mono, 16-bit (as that's what I used for the voice alerts defined above, so I knew that format would work) and was amplified 5 dB to make them louder without too much clipping.
Next, knowing that
the EFIS will first look for audio files on the USB drive and then use the internal ones, I created an "
Alerts" folder with those 10,000 alarm wav files on a USB drive and connected it to my EFIS. I then sat in the plane in my hangar and forced as many alarms as I could (by adjusting the criteria in the various settings pages), and as I heard each number in my headset, I wrote down what alarm each corresponded to. Next, I flew the aircraft and forced the remainder of the alerts. Then I assembled what I learned in a spreadsheet.
Finally, I went home and decided which alarms I actually wanted voiced, typed out what I wanted for each then
had them voiced by ivona (I've since changed to using
Amazon Polly) I then took those voices, dumped them into separate wav files with the correct filenames, as determined by their associated alarm numbers, and placed them on the USB drive that stays with my EFIS (it also has the charts and approach plates).
Whilst I would have preferred GRT's documentation, they gave enough information for me to create it for myself.


