30 August 2015

Painting. Interior paint planning.

I don't plan to have a cushy interior, so as only to reduce weight.  Thus, I plan to paint the interior and otherwise keep it bare.  To that end, I have spent much time considering what paint to use for the interior.  VAF is awash and such discussions.  Options range from pricey JetFlex to cheap hardware store rattle can types.

I've decided that the following are important to me:
  • Low cost.
  • Reducing application labor.
  • Quick-and-easy touchups.
  • Relatively high durability.

Thus, I've settled on the Rust-Oleum Hammered series of paint.  It's $5.75/can pre-tax locally.  The hammered finish gives a nice texture and helps hide surface profile irregularities and minor scuff and scratches.  I tested the paint on some primed scrap aluminum.  The paint is dry to the touch in less than an hour.  Fingernail dents are easy at 24 hours cure, and harder at 48.  The paint cures very, very hard after two weeks.  It takes a lot of effort to scuff it.  So it meets my, cheap, easy and durable criteria.

The paint comes in two flavors.  One is in a plain rattle can.  The other (about $2.50/can more) can be shot upside down which will be perfect for getting under the longerons.  I've chosen the silver color, though it's a little darker than I'd like.  The white was "too white" for me.  All the colors are somewhat glossy.  I figure if that's a problem later, I can hit the glossy areas with some clear flat spray to knock out reflection problems.  An inexpensive solution is the name of the game here.


I've found that the hammered finish comes out much nicer if it is applied to a smooth surface.  It turns out that some of my primed parts have primer that was mixed a bit thick (not enough water) so I got big droplets which dried before spreading and flowing on contact with the surface.   I think this can be tended to by some passes with sandpaper prior to painting.

Here are some parts from Sections 42 and 39.  Left pre-painting.  Right painted.


These close ups really show the hammered finish.


This shows the gloss characteristics.  Again, though I don't like it, if it's a problem, I can hit such areas with a clear flat to knock them out.


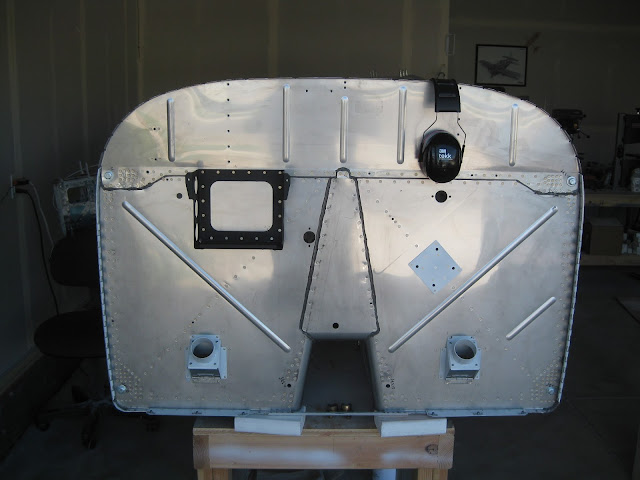
And for the heck of it, since I had leftover paint from painting the landing light cavities a couple of years ago, I decided to make the battery box black.  I like how the rivets give some highlights to the part, though they'll be later obscured by the battery.


19 August 2015

Powerplant: Propeller and engine ordered.

I ordered the engine and propeller today.  I'm not deviating from the intended design.

Hartzell C2YR-1BFP/F7497 74" aluminum 2-blade blended airfoil, constant speed.  $7,645.00 shipped.


Lycoming XIO-390-A3B6 210 HP, 4-cylinder, horizontal induction, constant speed prop.  $34,500.00 shipped.

17 August 2015

16 August 2015

Fuselage: Miscellanea. Dimpling difficult places.

The F-14036-L/R control column covers have some holes that are tough impossible to reach with my DRDT-2 and squeezer.  


So I put the dimple dies (dice?) into my channel locks and just squeezed.  Made nice, crisp dimples.


14 August 2015

Avionics: Pitot-Static. Audible beeping tone with varying frequency.

A lift reserve indicator (LRI) is a differential pressure measurement device that provides an indication of how much lift is available to the pilot.  Whilst I'm not schooled in how it might be different from an angle of attack (AOA) indicator, to me they seem the same.  Here is a great tutorial on how to build one, which is half of what I plan to construct.


The different zones are calibrated to mean the following.

Red Lift available is not sufficient for level flight.
Upper boundary represents stall speed.
Yellow Bottom boundary is just enough to support level flight.
Remainder represents slow flight/final approach region.
Green Lift available exceeds what's necessary for level flight.

A 0-2 inH2O differential pressure gauge is used as the LRI.  The Dwyer Minihelic II 2-5002 Differential Pressure Gauge, Range 0-2.0"WC is one such gauge.  Its specs can be found here.  Should you prefer a horizontal or vertical implementation, the Manostar FR51HV/VV would fit your bill (my apologies, however I do not know where to procure either version).  The input to either is a standard AOA probe, fashioned by one's self or purchased.  I will be using my Dynon heated AOA pitot probe.

I also want to have an audible indication of my LRI status.  For that I will need a transducer which will convert pressure differential into a voltage.  Then I will need to take that voltage and convert it into sound for the pilot.  My understanding is that the F-4 Phantom had a similar setup to help pilots fly at the edge of the flight envelope (I assume other military aircraft have the same instrument).  Here is a description from the F-4 flight manual and an image of the indicator (click here and search for "AOA" to learn more about that instrument).

The transducer I will use is the Honeywell ASDXRRX001PDAA5, which is available from Digi-Key, Mouser and Newark, among others.  It converts +/- 5 inH2O to 5-95% of 0-5 V.  It has 0.091" male ports.  Tubing that would work might be this nylon 1/8" OD from Grainger.  One can also use the remaining "PT 1/8 CLR PLASTIC" tubing from from the empennage kit or directly from Van's.


The output from this differential pressure transducer can then feed a simple voltage-to-frequency converter when the voltage reaches a lower threshold.  Here is one such circuit example, based on the LM331 and another here.  Another example would be a simple VCO (voltage controlled oscillator).  When I complete the design, I'll post more.  However with GRT's recent addition of AOA, I may not need the circuit and will just keep the "steam" based LRI.

13 August 2015

Fuselage: Cowl hinges. Length uncertainties.

An updated revision of the plans, Rev. 1, which was released on 5-May-15 by Van's, changed both the length of the hinge and the location of eyelets on FF-00006-L/R.  Below shows Rev. 0 on the left and Rev. 1 on the right.


The hinge fits in the location illustrated below.


I originally cut the hinge according to Rev. 0.  However, I was concerned that the location of the eyelets specified in Rev. 1 was critical.  So I bought new hinge (when I happened to be in Oregon last month and stopped by Van's for an over-the-counter purchase) and match drilled it to my original hinge (since I had already dimpled the firewall flange).

Upon sealing the firewall flange and riveting the shorter Rev. 1 hinge to the firewall and shim, I noticed that the hinge was too short to cover the entire length of the shim.  In fact, it was short by exactly one hole.  I decided to drill out my Rev. 1 hinge and replace it with the longer Rev. 0 hinge (which exactly matches the length of the F-14134B-L/R cowl hinge shim) plus, I removed an additional eyelet according to a recent post on VAF.

Here is a direct comparison of the Rev. 0 and 1 hinges relative to the shim.  Again, I removed an additional eyelet on the Rev. 0 hinge.  This is the one (white hinge below, now erroneously labeled "scrap") installed on my aircraft now.


The right side now looks like this.


In retrospect, looking at Section 35, Upper Forward Fuselage, I could have just lengthened the upper hinges by one hole as those hinges too have shims.  Oh well.