31 October 2013

Wings: Fuel tanks. Left wing fuel tank mounted.

I decided to redo my fuel tanks.  See here for why.  The entries specific to the redone tanks are here.

Mounted the left wing's fuel tank myself.  Not too bad on my own.  A friend helped me move the right wing off the cradle so I could hit the top screws.  All of the bolts are torqued down and marked with Torque Seal.  The screws are merely "snug" for now.


It's a much larger wing than the RV-9, the only other model I'm familiar with at this point.

30 October 2013

Empennage: Kit inventoried, except for hardware.

Inventoried the empennage kit today, save for the hardware bags.  Nothing missing so far.  Again, hats off to Van's:  Incredible packing strategy.

Untouched crate.


Skins, mostly.


Spars, angle, J-stiffener, etc.


Ribs, stiffeners, doublers, etc.


Hardware to be inventoried later.


Mountain of packing paper to be recycled.


I was so happy that my piles of wing hardware are nowhere to be found.  The empennage kit and its explosion of parts is...disheartening to say the least.

28 October 2013

Wings: Ailerons. Bottom skins on.

Bottom skins are on the ailerons.  Trailing edge wedges and lateral rib riveting remains.  Below images have left on left and right on right.


I used AN426AD3-4 rivets on the lateral-most holes.  This is where the nose skin, spar and main ribs' tabs mate.  The AD3-3.5 called out in the plans are too short, as I determined when doing the analogous holes on the top skins.  When using a AD3-3.5 on the bottom skins, you risk the rivet not catching the rib's tab, making life very difficult (this is because, in order to get your hand on the bucking bar resting on the spar, you need to pull the bottom skin out, which positions the tab off the rivet).  I drilled out a rivet four times before I decided to up the length to an AD3-4.  Below is the left aileron inboard side with the bottom on the bottom.  The bottom inboard-most rivet is AD3-4 whilst the top inboard-most rivet is AD3-3.5.


For the inboard-most spar-nose skin rivet, I used the back rivet set to hit the manufactured head.  This is because the overlapping bottom skin immediately adjacent creates a standoff that prevents you from getting the rivet flush if you use a mushroom set.


The plans warn against letting the bucking bar drive into the stiffeners of the bottom skin, so be mindful of your bucking bar size and test its fit before use.  Mine just cleared the stiffeners, so I had no issues.


I calibrated my gun's air pressure so two half-second hits would completely set each rivet.  When riveting, placing the mushroom set so it also just overlaps the joint between the skins helps smash the skins down and eliminates pillowing between rivets.  I ended up with awesome, gap-free seams.


27 October 2013

Wings: Ailerons. Outboard rib-to-spar riveted.

As I mentioned previously, the outboard rib-to-spar rivets are extremely difficult to access (Update 31-Mar-20, see below): .  With the manufactured heads on the spar, the face of your rivet set is too large to seat on the universal rivet's head properly.  Conversely, with the shop head on the spar, you need a very narrow bucking bar to get into the space between the outboard hinge brackets A-1006-1A and A-1006-1B (in fact, you're better off not riveting A-1006-1B to the main rib until after bucking the rib to the spar, which is contrary to plans).


Measuring the space between the outboard hinge brackets yields it to be precisely 0.5".  Turns out, I have a bucking bar with just that width.  Admittedly, it's poorly shaped for the task and fairly light to be bucking AD4 rivets, however I managed just fine with some planning. 


Covering it with tape to prevent it from marring and removing the primer from the inside of the outboard hinge brackets, I was able to push it in to meet the shop head of the AN470AD4-4 rivets (the top-most rivet was instead easily buckable with the tungsten (wolfram) bucking bar as the taper of the brackets meant access was no longer impeded at that rivet).   Here it is seemingly floating as the friction presented by the brackets hold it in place.


Then I used my 10.5" long straight 1/8" rivet set to clear the length of the top skin. 


An example of how everything lines up is shown below.  Obviously, I need to hold the bucking bar when actually riveting.


You can see here how awkward this approach is below.  It took planning, rehearsing and great care to make sure the bucking bar wouldn't slip (even with all the friction holding it between the brackets, the violence of riveting moves the bar around and in doing so it can contact and ruin the shop heads of the set rivets previously completed) and that I wouldn't lose control of the rivet gun with the leverage inherent in using that long 10.5" set.


I would have been better off with a 13" long set since I was forced to put a slight smile into the rib flange at the top-most rivet.  This was due to the 10.5" set requiring a very subtle angle to clear the skin.  This is even after I removed the spring from the gun to give more clearance.  However, the minimal marring was sanded out and spot primed over.  Below are the manufactured heads with the slight smile on the rib flange sanded out, prior to spot priming over the area.


Here are the shop heads.  The primer around the heads flaked off following expansion of the spar.  This has actually been a very rare occurrence in the build overall.


Excellent.  On to riveting the bottom skin to the spar, then the trailing edge wedge.  Need to get the latter right this time as it didn't go well last time.

Update 31-Mar-20:  Six-and-a-half years later, I decided to build another set of ailerons since I wasn't happy with how the trailing edges of the set came out.  As part of having accumulated experience in construction, there is another way to buck the rivets outlined in the post above such that the manufactured heads are on the outside.  See below.


 Grind down a side of an offset rivet set (the tape is to prevent marring of the aileron).


Now the manufactured heads will be on the outside.

26 October 2013

Wings: Ailerons. Nose and top skins on spar.

The nose and top skins are riveted to the spar on both ailerons.  Fairly straight-forward process.  Some rivets holding the nose skin to the nose ribs are blinds (MK-319-BS).  Though a squeezer can fit with the right yoke, I believe the skin curvature is excessive for the squeezer sets to accommodate, hence the blinds.  Anyway, after completing all skin-to-rib rivets, I noticed this unfortunate occurrence on both inboard ribs.  Yes, if you look closely, a rivet is set in there, it just moved the tab out of the way.  That's no good.


Here was an opportunity to learn how to remove pop rivets.  Turns out, it's fairly simple (at least, if you can access its "shop head" side).  First, tap the mandrel out of the body (see image below), then hold the body with a needle-nose (to prevent spinning) and drill to remove the head.  Finally, yoink the "shop head" side out with the needle-nose.


Below is the replacement rivet with the tab properly positioned (compare to very top image).  This required one hand to push the tab against the skin (after all, it was bent out), one hand to drive the pop rivet tool and my chin on the tool's head to push the rivet's head down flush.  Good times.


Here are the ailerons setup for riveting their top skins and spars.  The astute will note the fuel tanks directly behind and the flaps in the way background to the left.


Here are the ailerons with their top skins riveted to the spar.  The right side is in the foreground.  The  tungsten (wolfram) bucking bar makes this so easy.  In fact, did both top skins in 47 minutes.


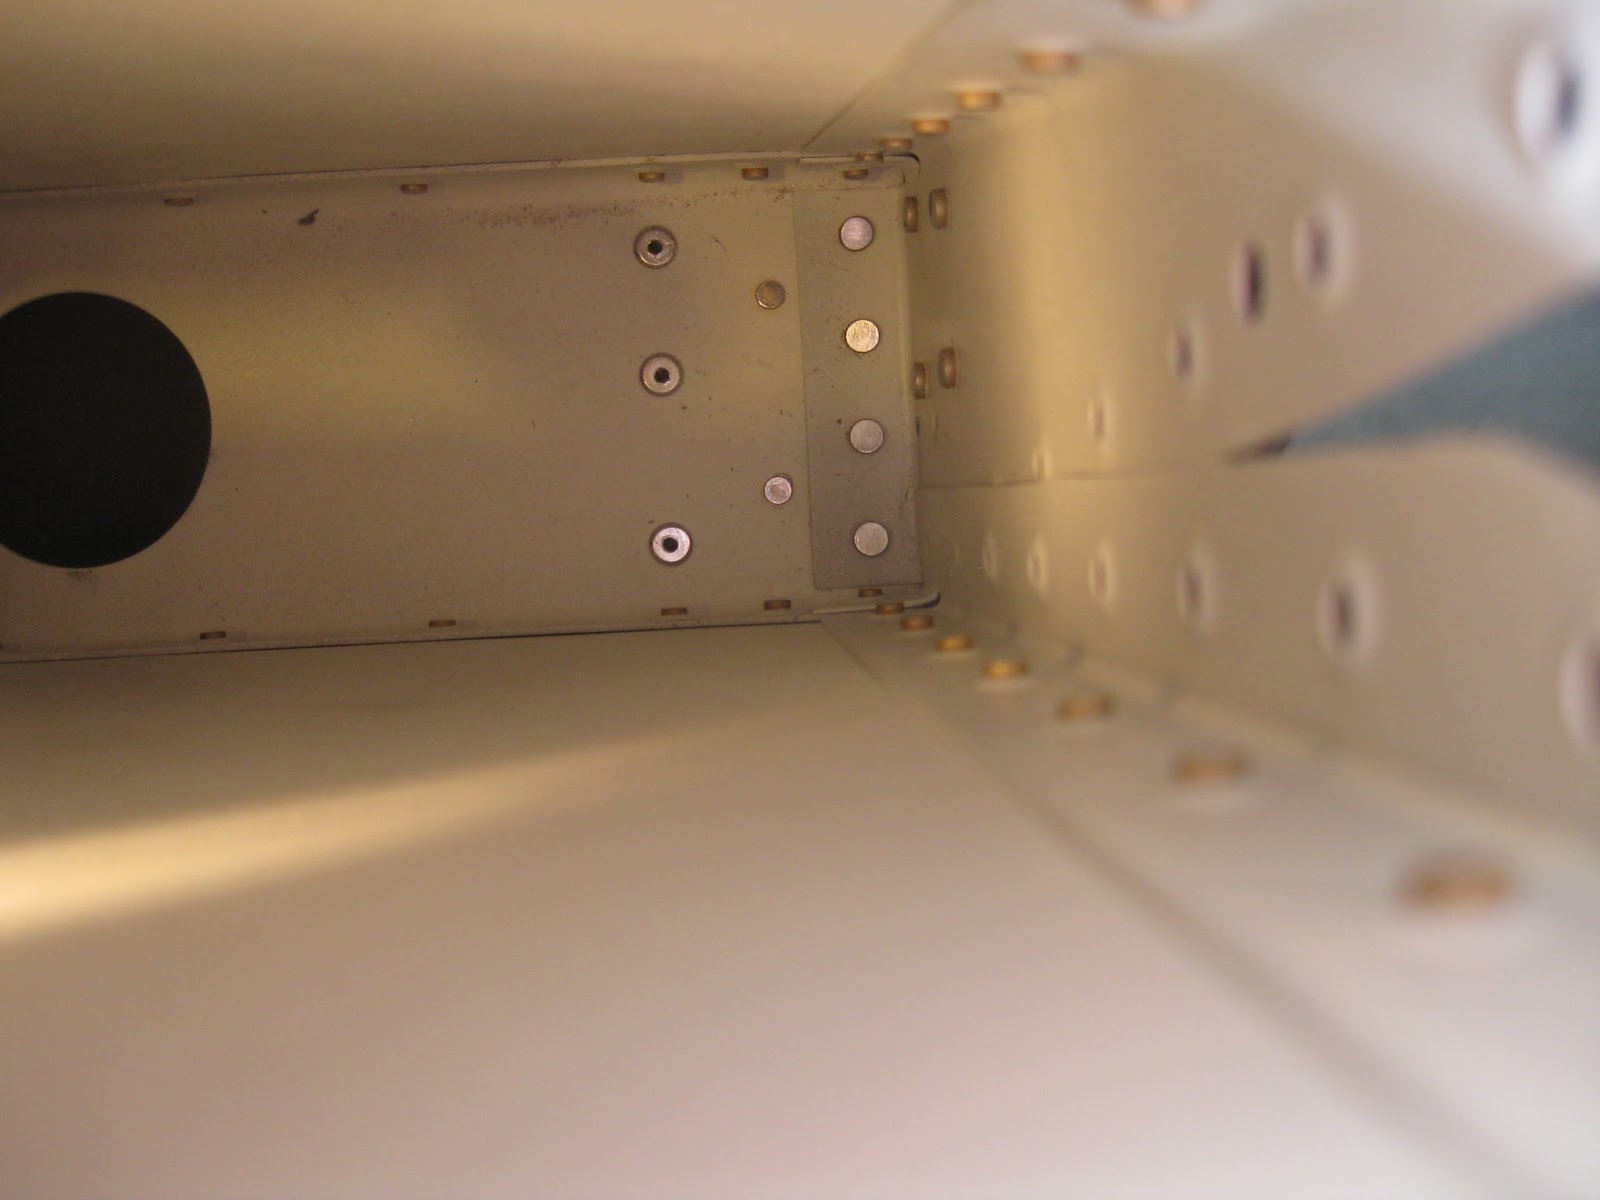
I'm trying to solve how to set the rivets shown below.  A post with the associated solution will follow.  For now, I believe that part A-1006-1B (outboard hinge bracket) should not be riveted on the outboard rib until after the A-1005A ribs are riveted to the spar.  This is contrary to plans, however that bracket seriously impedes access to the AN470AD4-4 rivets and that bracket can be easily squeezed-riveted after the skins are in place.


25 October 2013

Empennage: Empennage kit delivered.

FedEx delivered the empennage kit today.  They called yesterday to setup the delivery time.  This was the only true indication it was shipped.  My credit card was charged the remaining 75% of the kit cost last Friday and the shipping charges were applied this Wednesday.  Monitoring my card's charges was the "notice" I got.  Though it would be nice to get direct notice with a tracking number from Van's, they've hit their target shipping dates each time so there's truly little to gripe over.

No visible damage.  Driver was curious about the contents.  He said he'd gone up in a hang glider and "that was enough for" him.  I can appreciate that.


Waiting in backyard (a.k.a., the rock garden) for the house to devour.


House swallows the crate.


Here it shall sit for a few weeks until I get the time and space to unpack and inventory.  You can see ailerons in the background and the wing crate (the empty wing crate) in the upper left.  Once again, Van's, your packaging performance is truly amazing!


With those big skins, the kit leaves me with a challenge similar to that of the wings:  I probably won't be able to complete construction in the limited confines of my basement.

24 October 2013

Wings: Pitot-static. Heated AOA/pitot wiring complete.

The Dynon heated AOA/pitot wiring has been added.


Clearly, I chose to mount the electronics box on the access panel.  I tried many different permutations of mounting it on the rib and I just didn't like how it would either 1) require additional mounting plates or 2) not be fully seated on the rib.  See examples here and here and on an RV-14 here and here.  The access panel approach solves all those problems plus gives easy access to the box.

I still haven't put the bottom skins on as I'm waiting to complete the autopilot roll servo fitting and landing light wiring.  You can also see part of the AOA/pitot mount cleco'd in on that image above.

Parts needed were:


Read the entries in my AOA series:

21 October 2013

Wings: Ailerons. Temporary assembly.

Ailerons were temporarily assembled to check for a straight noseskin.  Here is the left aileron with top skin on.


Checking for noseskin bowing, left and right sides.  Didn't find any.  Note, the ruler on the right side is misaligned on the outboard edge in the image.


Right aileron, top and bottom sides.  Trailing edge wedge not yet cut to size.


Here's the tool I used to ensure the angle on the trailing edge wedge holes was perpendicular to the aileron's chord.  This was a design from the control surface practice project.  It's a small piece of wood with an 84 degree cut from the miter saw.  The length of the drill bit is rested on its surface to hold the angle.  On the left image, the astute will notice that I'm holding it incorrectly in the demonstration image (the proper 84 degree angle is marked on the piece as shown).  The right image is another posed one where I taped the tool to the skin for demonstrative purposes.


The inboard hinge bracket for the left side is the left image below.  It's countersunk to hold a AN509-10 screw.  The countersink is fairly well centered though I need to go deeper into the doubler.  However, look at how poorly I did the right side.  The bit chattered and really elongated not just the hole, but the countersink too.  I didn't catch that before riveting this pieces to the inboard rib.  I have to redo it.  It's too critical a part.  Update 30-Dec-14:  I was looking at this post and realized that the countersinks in the below pictures should go through the hinge and its doubler, which clearly they are not.  The ailerons are mounted now and I can't immediately determine if I caught this error prior to then.  I made a note for myself to check this when I remove the ailerons later.


Removal of the inboard hinge bracket from the right aileron wasn't something I was looking forward to as a mistake would mess up the whole inboard rib which could cascade into a messed up top skin.  However, I was able to remove the four AN426AD4-4 rivets holding the bracket to the rib without trouble.  Here are the removed shop ends.