
I've decided to go with the Grand Rapids Technologies suite of instruments for a variety of reasons. This means that some (much?) of the preset wiring for the kit will be discarded as they're for Dynon (Update 19-Apr-17: I ended up doing all over the wiring myself). The first departure was the autopilot roll servo. Don't need the kit's wiring for that. In speaking with GRT, it seems I'm the first RV-14 installer of their servo. Since the -14 wing is just a shortened -10 wing, GRT suggested I use their high-torque roll servo kit.
Van's provides a servo mount for the -14 which includes an aperture on the outboard side to accommodate a Molex socket that isn't needed for the GRT harness.

GRT's RV-10 mount is, other than that aperture, the same as the -14 kit's mount. Turns out that aperture does not impede the servo arm's travel or its AN3H-7A bolt. So there's no need to use the bracket from GRT's kit.
GRT doesn't have an install manual (though they are working on one). They told me that their servos are physically identical to Dynon's and TruTrak's so I used their install manuals to figure it out (Brian has a nice set of images documenting his RV-10 install). However, the servos from each of the three manufacturers are not identical. This is a key point when it comes to the support bracket, as described later.
Here are some images showing a pre-install test fit. Below you can see the white (primed) bracket that comes with the -14 kit. The black bracket is the one for the -10 included in GRT's kit. Other than the aperture, they are the same. Again, it's clear that the servo's arm will clear the aperture on the stock bracket.


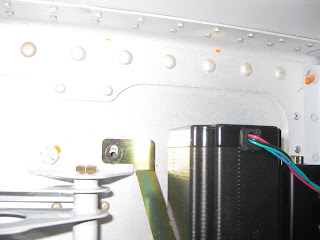
Here you can see how the servo will sit in the bay for the aileron bellcrank.


However, because of the weight of the servo, there is a support bracket that braces the servo against the upper bellcrank bracket (see below, from Dynon's manual).


With the TT bracket secured to the servo body, it was clear that the foot of the bracket was not aligned with the hole for the upper bellcrank bracket when the servo body was secured to the lower bellcrank bracket.


Here you can see how the servo will sit in the bay for the aileron bellcrank.


However, because of the weight of the servo, there is a support bracket that braces the servo against the upper bellcrank bracket (see below, from Dynon's manual).

GRT includes some stock metal in the shape of an "L" and leaves it to the builder to shape and drill. I deemed it too difficult
for my skillset as I was unsure how to get the bends at the correct
angles and lengths so the bracket would fit properly. Given that GRT told me that their servo was the same
physical size as the others (again, they're close, but not quite the same, as I learned), I bought Dynon's support bracket. However
it was both too short and that screw with the safety wire
(henceforth, SWS) prevented it from fitting. The SWS of concern is shown below. It's the one at the top (which is forward when mounted in the airplane).

Next I bought TruTrak's
bracket to see if theirs would better fit GRT's servo. All brackets are shown below (GRT, TT and Dynon support
brackets left-to-right) after I modified TT's and Dynon's (described in next paragraph). Also, both TT's and Dynon's
brackets are much more rigid than GRT's. The former are cadmium-plated steel.

TruTrak's bracket was slightly longer but it too would not accommodate the servo's SWS. So, I bought a 9910 tungsten carbide cutter for my Dremel and enlarged the hole so the SWS would fit (I did the same for the Dynon bracket, as shown above, just to see if fitting would improve). Following that, I then found that the AN960-10 washer would not clear the SWS, as shown below.


With the TT bracket secured to the servo body, it was clear that the foot of the bracket was not aligned with the hole for the upper bellcrank bracket when the servo body was secured to the lower bellcrank bracket.

However, after pushing
the servo body down with some slight deflection of the lower
bellcrank bracket, the servo can be mounted securely.

The RV-14 plans call for a nutplate to be attached to the right
bellcrank for a roll servo (below from page 23-05, 15-Apr-13
revision). It appears the other models require a bolt with a nut. Van's just made it a little easier with the -14.

Below shows the tight clearance between the bellcrank rod end and its AN970-3 washer even when using two AN960-10 washers in addition to the 0.563” aluminum spacer. It appears that three AN960-10 washers are needed for proper clearance. Clearly the spacer needs to be about 0.12" longer.

So, as of now it fits. But I plan to coordinate with GRT to see if they'll release a spacer and support bracket specific to the -14 (Update mid 2018: They haven't).
No comments:
Post a Comment