08 February 2014

Empennage: Elevators. Rear and front spar riveting.

With one only skin on, the elevator rear spars are simple to rivet.  The tungsten bucking bar (henceforth, "Mr. T", so dubbed by my RV-9A friend who lent me much help over four days).


The elevator rear spars, in the area absent the trim tab, are recessed behind a good 5.5 inches or so of skin.  Always preferring squeezing to bucking, especially on control surfaces, I tried to get a super deep yoke, and after grinding away a notch to fit the spar, the yoke turned out not to fit my squeezer without grinding some of the bottom fork.  Can't return that!  So, I went with the special bucking bar suggested in the plans.


I used my steel plate to provide a rigid counterpoise against the lever arm, after shimming the elevator up.


A flashlight illuminates the contact point between the shop end and bucking bar since the bar will rotate around the fulcrum between it and the steel counterpoise during the violence of the bucking process.  We managed this movement by hitting the rivet in 3 short, consecutive bursts, separated by enough time for me to yell "stop" if the bucking bar had slipped excessively.  Right elevator shown below.


The left forward spar was easily riveted with the squeezer.  Left elevator shown below.  Skin is tight with the second-from-inboard lower sector having some oil-canning.  I can reach in through the forward spar lightening holes to seal in a light stiffener.  Shame, but not a big deal.


Right elevator isn't shown at the same state as above because I messed up two rivets holding the tip rib to the forward spar.  When we drilled them out, it became a mess because access was, well, impossible.  We managed to set the replacement rivets after upsizing one to an AD5 (from an AD4) but I didn't like how it looked.  My tech counselor was okay with it, but in the end I decided I didn't want it in the plane, so I will be redoing the right front spar.  I have a lot of scrap metal from this project!

Empennage: Elevators. Trim tab reinforcement doubler and gusset riveted.

The trim tab reinforcement doubler is attached to the front spar with AN470AD3-3.5 rivets.  


These are 1) hard to access and 2) round headed.  I don't have a rivet set for AN470AD3 size rivets.  I do have a squeezer set but I didn't have a bucking bar to mount it in.  We tried the below, but it wasn't deep enough to clear the skin over hang.


So we just bucked it with my narrow flush set which is acceptable (see 3.3.3.2).


Wasn't too bad to get in there.  Just took some planning and care.


Here's what the shop end looks like on the most difficult trim tab reinforcement doubler rivet.  Pretty good actually.  You can see we scuffed the one pop rivet there, but that's not an issue.  We did have to drill the original rivet we placed here since the bucking bar slipped against the nutplate and destroyed the shop head.


Squeezing the gusset rivets isn't easy.  Had to upsize one to an AD4.


We had to drill out the three upper inboard rivets holding the skin to the rear spar and piano hinge since I mistakenly closed things up before riveting the gusset to the rear spar. Not a problem and those rivets were easy to hit.


Next up is sealing in the foam ribs, closing out the lateral tabs and bending the forward skins shut.

07 February 2014

Empennage: Elevators. Trim tab trailing edge riveted.

Elevator trim tab trailing edge is riveted.  Because these trailing edges are much thicker than those of the wedges used in the other flight control surfaces, it's much easier to preserve the straightness of the edge.


You can see the 3M F9460PC VHB™ Adhesive Transfer Tape sticking through.  In the future, I would use sealant for 1) a nicer look and 2) some semblance of corrosion protection.  In fact, I ended up using it on the left elevator only because I had already mixed it for the foam ribs.

03 February 2014

Wings: Fuel tanks redo. Delivery.

Because I'm redoing my fuel tanks, I'm really only posting progress reports rather than additional details.  See here for why I'm redoing my tanks.  Technique details on the original fuel tanks are found in their associated posts.
60x23x8 inches at 80 pounds.  The contents of this wonderful box represent an extraordinary piece of mind.


An ingenious methodology to the securing of sealant for shipping.


They cut the 60" J-stiffeners to fit in the 60" exterior length box.  Inside length of the box is 59" and the required length of the stiffeners for the tanks is 54".  Unfortunately, they cut the stiffeners to 52" (with shears no less, so the edges are warped).  Initially I thought I could just overlap two stiffeners to make up the 54" length, as is done in the wings, but then thought it would just be an invitation for later potential leakage.  I will discuss with Van's to see if they'd be amenable to replacement.

Shop: Bought a Semco sealant gun.

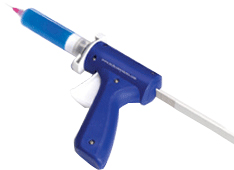
When I sealed my original fuel tanks (see here for why I'm redoing them), I used a $77 manual syringe gun (it's much cheaper on eBay, should have checked there first!).  It made things much easier than using Popsicle sticks and cotton swab stems.  However, it was hard on the forearm muscles and would continue to dispense after releasing the trigger.  Also, the 1 ounce syringes weren't realistically reusable, though at $0.62 each, that wasn't too much of an issue.


Turns out, one can find used Semco guns on eBay for much less than I bought my syringe gun for.  So, I picked up a used Semco model 250-A sealant gun for $30.  When done, I can probably turn around and sell this for what would essentially be a wash.


Mine comes with a 2.5 ounce container which is more than what I had with my syringe gun, so I'm thinking that I could buy a few 2.5 ounce cartridges and nozzles, fill them up with sealant as needed through the day and use them.  The next day I can easily pull the partially cured sealant out of the cartridges and reuse them.  I did something similar with the syringe gun to clean it.  Sealant does not stick to smooth plastic very well so it just peels off.

Stay tuned to this post to find out if Techon cartridges, plungers and nozzles work.  They're much cheaper than Semco's and look like they're the same shape.  Update 12-May-14:  I have verified that these do work with this gun.  Update 17-May-14:  And this elbow makes getting into crevices a breeze.